-
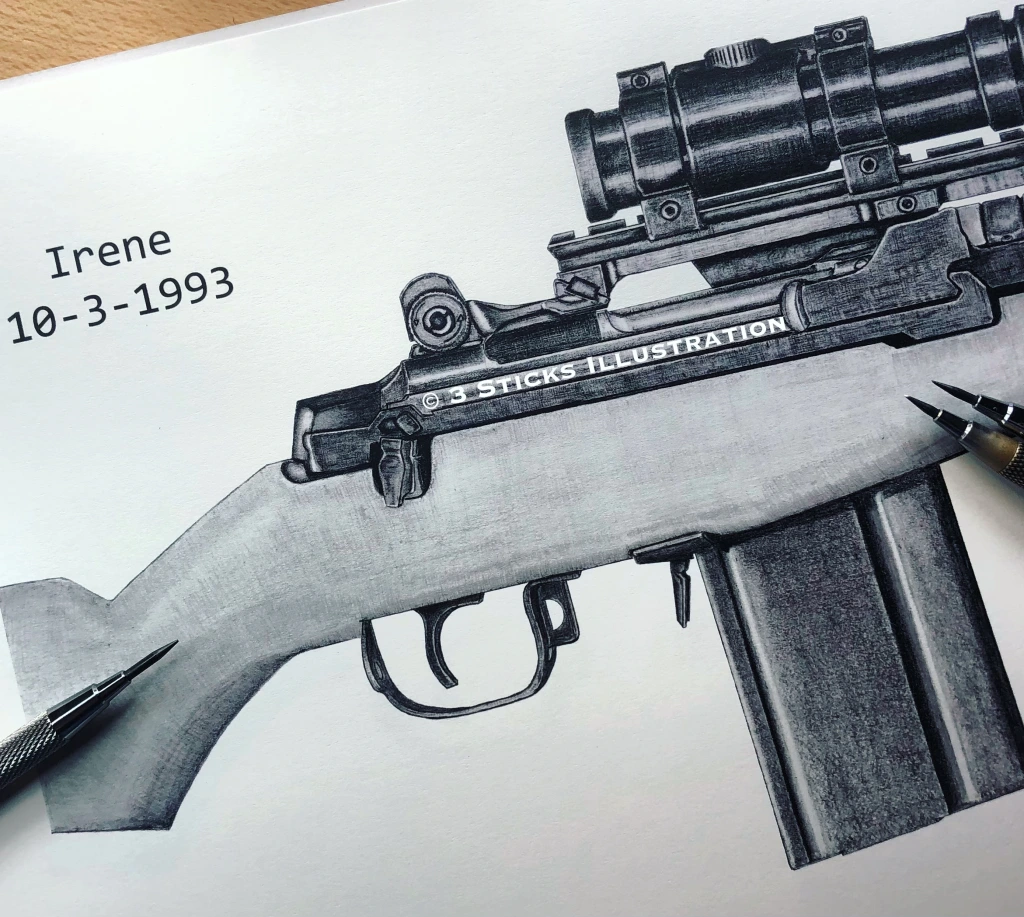
3SI: Drawing the SFC Randy Shughart M21
“We have a Black Hawk Down, I repeat. We have a Black Hawk Down”
If you are like me, a teenager in 1993 you may or may not remember this happening in real time. You may not have heard about it until Mark Bowden’s book, “Black Hawk Down”, or maybe even the movie. I was in the Navy on med hold with a broken hand when I picked up my copy. I had the time and read it from cover-to-cover numerous times. Simply an incredible story and battle.
After I was out of the Navy I would listen to interviews of Paul Howe and re-read the original articles Mark Bowden had published. Something about the battle. The men, the Delta Force guys, the Rangers, the sheer lopsidedness of it was awe inspiring.
Fast forward to social media in 2021. The rat race that is the art world and its utter reliance on platforms like Instagram, artists often chase trends, special release dates and such. Just follow any popular artist and you will see the mad dash to capitalize on any current event or movie release to gain exposure and sell prints. “May the 4th be with you” is a big one in the Star Wars world, followed by “Revenge of the 5th” etc. I am not personally good at following these trends and making these “deadlines”. That’s on me, I draw slow… And go through plenty of artist burnout.
Maybe one day I’ll finish my Mando
But as an artist that kind of tries to care about the rat race, I have different dates. Dates that mean more than Star Wars. Maybe I’ll make May the 4th some day. Maybe not. Nope, the dates I care about are dates that honor and reflect on sacrifice. Late August 2021, I was reviewing my drawing schedule and was thinking about those dates again. I was too late for some but not for October 3rd.
Why October 3rd? That was the day the Battle of the Black Sea (As it’s officially known) happened. When “Irene” came over the intercom. When 19 US servicemen went into harms way and didn’t come back. When numerous others were physically wounded, mentally wounded and when 2 volunteered to never come back. When Snipers MSG Gary Gordon and SFC Randy Shughart went in to help save CWO Mike Durant (Blackhawk Super 64 pilot). They knew exactly what was going to happen. 2 amazing warriors facing down a city trying to kill them. They made it to CWO Durant and bought him time. Time that saved his life at the cost of their own. They didn’t hesitate, they had to ask 3 times for approval to be dropped in. It wasn’t a split-second decision to jump on a grenade, no less heroic by any means. These 2 Delta snipers saw the battle from above, watching it unfold and their concern was to get in there and secure that crash site and protect the downed crew. Worthy of the Medal of Honor, damn right it was.
Worthy of myself trying to draw something to commemorate their sacrifice and the men of that battle? At the end of the day, I can’t put out something that I wouldn’t hang on my own wall. It doesn’t have to be perfect, it’s a drawing. But it had to be good enough that I’d hang it up, buy it if I saw it somewhere. Know what it meant whenever I looked at it. Could I pull that off? As an artist, veteran, and a “Gun Guy”?
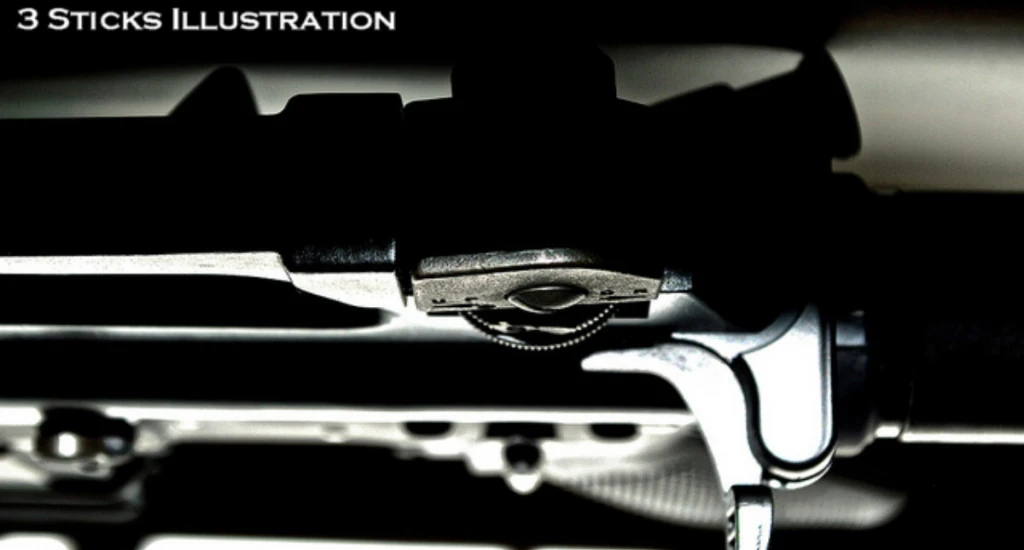
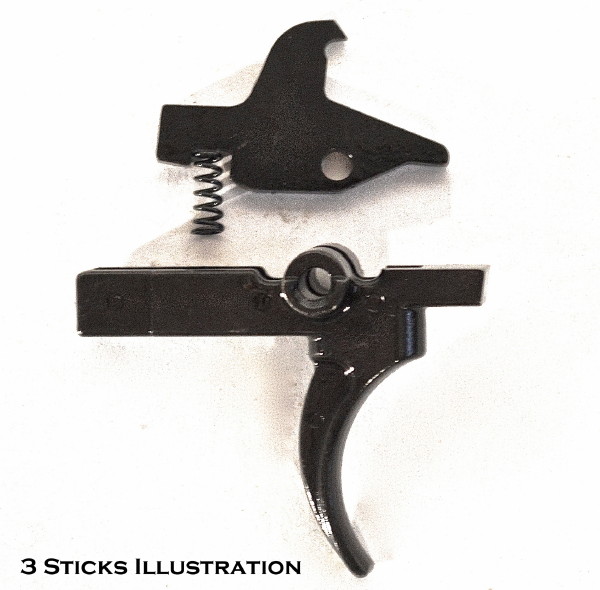
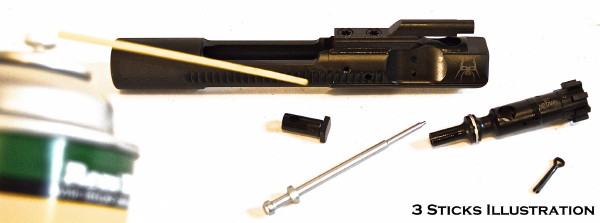
What would I draw? An M21 obviously, right? SFC Shughart’s M21 has become an iconic symbol of that battle. The rifle itself draws emotions that attach the viewer to that event. But I hadn’t drawn a gun yet, hadn’t tried. It was up my alley in terms of my personal background and artistically I had mostly done precision line work with anatomy. Could I use that experience to do justice to a rifle? I researched my references, I don’t have an M1A in any fashion, they are expensive. Garand Thumb had done a YouTube video on his Shughart M21 build and I used that as my base. I researched most individual parts from the optics rail and Aimpoint to the bolt, trigger and mags. Finding the best images I could use as reference to help me “understand” how to draw them and especially how to shade the parts and add texture.
Up until this point, my drawings had been line art with hatching and cross hatching. Not filling in an entire piece like this with graphite. When I started this piece, it was just formatting the drawing and seeing if I could even get the lines right. There was a decent bit of frustration at different areas in the process. Lots of measuring, plotting point and “close enough”. The rear sight, bolt and worst of all, the magazine release. I must have practiced drawing that part 20 different ways 20 different times to get the right swoops and angles.
Amazingly, I was able to put down a fairly good, lined out M21, optic and all. Now it was time to figure out the graphite shading and texturing. I hadn’t done much of this, especially metal. If you are an artist, you will know that there are a few different ways to shade and bring out different textures. One way is to lay in some graphite and use blending stumps, Q-tips and even your fingers to blend it together. I don’t like that method. It’s valid and people do amazing work with it. I don’t. My background is in hatching, and I decided that was the way to go. With good paper and hatching I could create different textures of worn metal as I cut into the paper with pencils that were just shy of being needle point sharp.
I used all the leads I had, 4H through 8B and found my new love, “F”. Which I now refer to as my “Gun Metal Grey” lead.
The process of laying down the lines to create the rough metal textures was long, painful and tedious. Little lines hatching in only a few millimeters tall for a section, stacking all the leads on top of each other and blotting out with my trusty knead eraser to find the proper tone of grey. Lines down, blotted, lightly shaded, blotted, crosshatched, lightly shaded, blotted, re-hatched and so on and so forth with 4H to F and darker where needed.
I found a flow in this and felt good about it, and then it was time to do the stock. That’s not metal. I chose to texture the stock fairly rough, as if it was a rough fiber glass stock. I really dug in and made larger deeper cutting marks with my pencils here. This was the first time doing this as well, getting the proper tone of grey was not easy for me. I erased and blotted clean multiple times and by chance came across a method that gave me what I was happy with. Not what I was looking for. What I was looking for was in my mind’s eye, but as an artist, I was not capable of creating it. But I was in acceptance of what I stumbled onto. I am not a photo realistic artist, not even close. And I am ok with that, and I was happy with the final drawing. That was the goal, to be happy with the drawing to want to hang it on my own wall.
I am still happy with it and learned a ton in the process. I recorded the drawing and had a friend write music for it that I felt was fitting for the reason of the drawing. While working on the drawing I often listened to the radio chatter of the battle and tribute videos on YouTube. That and my son got me hooked on The Stupendium. Odd combination but what are you gonna do?
Just be grateful men for men like MSG Gary Gordon, SFC Randy Shughart and their teammates.
In total the pencil to paper time was about 60 hours and another 20 hours of cleaning up in the computer for prints. Worth every second!
*Training with firearms is an inherently dangerous activity, so is drawing them.
*This post and the information herein is for informational and educational purposes only. Use at your own risk. Always follow the 5 rules of Firearms Safety when handling any firearm and its drawing.
*If you like this content and would like to support the page you can do so here.
-
Range Bag
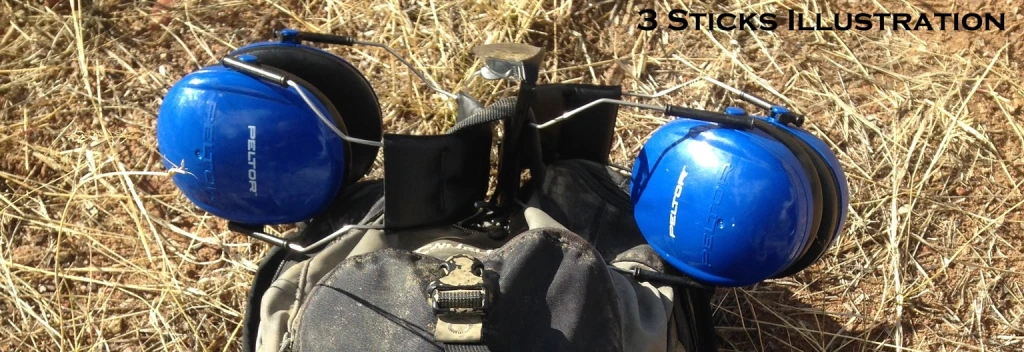
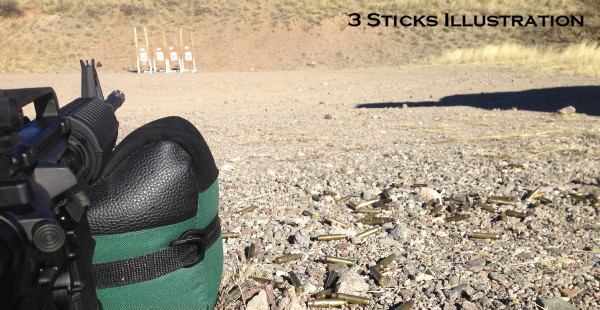
There are plenty of options out there for Range Bags and I am not one for reviews. So this is not a review of any particular Range Bag. As you can see, my Range Bag is a Camel Back HAWG that I painted with some Kyrlon spray paint that doubles as my hunting pack, hiking pack and anything I want it to be pack. Its primary duty is as a range bag and it is always loaded down a very specific set of items that I have refined over the years.
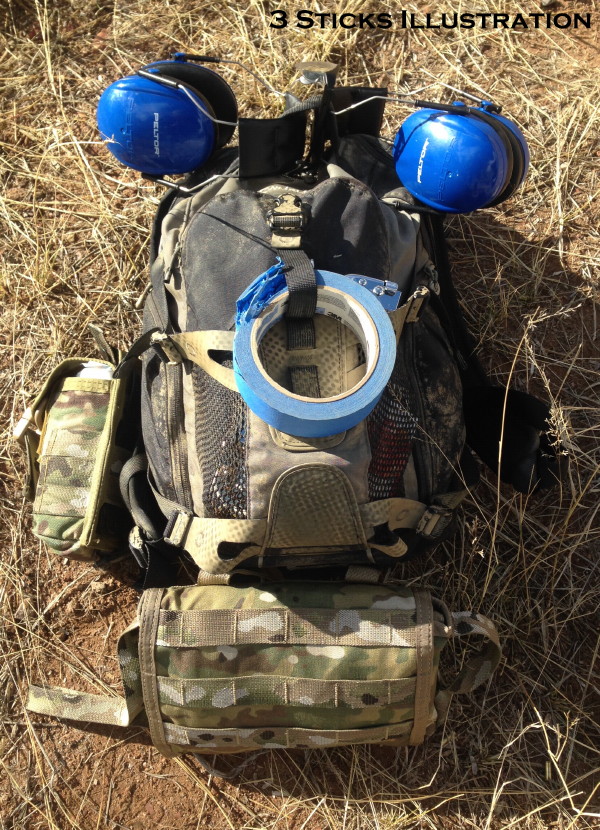
So while this is not a “Review” this is an article on what I consider some must haves to never leave your Range Bag.
Ear/Eye Pro– Always leave some form of Ear/Eye Pro in your bag. About the only thing worse than showing up to the range without Ear/Eye Pro is showing up without bullets or your magazines… If you’ve been shooting long enough, you’ll do it eventually. While I am fine shooting without Eye Pro on occasion, the only time I shoot without Ear Pro is when I am hunting. Now you can wear electronic Ear Pro and actually amplify your ability to hear game and other stuff all the while protecting your hearing.
I personally always keep a set of muffs on my pack. One of the pockets is full of foamees and other kinds of Ear Pro. These are often for other shooters that forget their Ear Pro. I have electronic Ear Pro that I just don’t use as much but will throw it in the pack when needed but is not a part of my pack 100% of the time. My glasses stay on top of my hat. My hat always on when I head to the range.
IFAK!!!– Yes, the Individual First Aid Kit. Folks often misunderstand the use of the IFAK so while at a very minimum you should keep an IFAK with in your Range Bag at all times you should also stock a larger FAK (First Aid Kit).
Are you asking yourself why I say folks misunderstand the use of the IFAK? Let me explain. The IFAK is a last ditch Gun Shot Wound (GSW) kit that is most likely going to be used on YOU if you ever really need it and should be reserved for such an instance. Other wise you should have a larger FAK for use on other people should any unfortunate event ever occur. This doesn’t mean you need a ton of stuff nor does it need to be needlessly large. Your FAK should be larger than your IFAK but still easily portable and contain stuff for minor injury as well as basic trauma supplies similar to your IFAK. Also understand that it’s ok to have items that you don’t know how to use. The reason for this is that while you may not be able to use some items, others nearby may in fact be qualified to use them.
You can read more on the IFAK/FAK here.
Tools– More than a set of multipliers? Yes, but not too much more. At a minimum a set of multipliers, a small bottle of CLP/Oil of some kind and some rags. I also carry a small set of mini screwdrivers mixed with Allen keys, a small punch and a AR15 military issue cleaning rod. I can take care of any minor problems with these tools and if it requires more than that then it’s more than a minor problem.
Target Supplies– I carry a large folder with a multitude of different targets plus a small bag full of 3×5 cards. Always sucks to show up without anything to shoot at. Now you need a way of attaching them to your target backer, right? A staple gun with extra staples never leaves its pocket. Next to that is some tape to cover bullet holes and a tape measure.
Miscellaneous Items– I always carry a small notepad, pens, markers, gum and an extra 9 volt battery for my shot timer. *And thanks to Dugan Ashley, Skittles.
After all of that you still need room to carry ammo, extra magazines and guns. The way I look at my Range Bag is that I can fit a few hours of shooting into it. Any more than that am I am just wasting my time as I can only really focus and put in quality training for a few hours. Past that and I am just making expensive noise.
What’s in your Range Bag?
*Training with firearms is an inherently dangerous activity.
*This post and the information herein is for informational and educational purposes only. Use at your own risk. Always follow the 5 rules of Firearms Safety when handling any firearm.
*If you like this content and would like to support the page you can do so here.
-
IFAK: Can You Save Your Own Life?
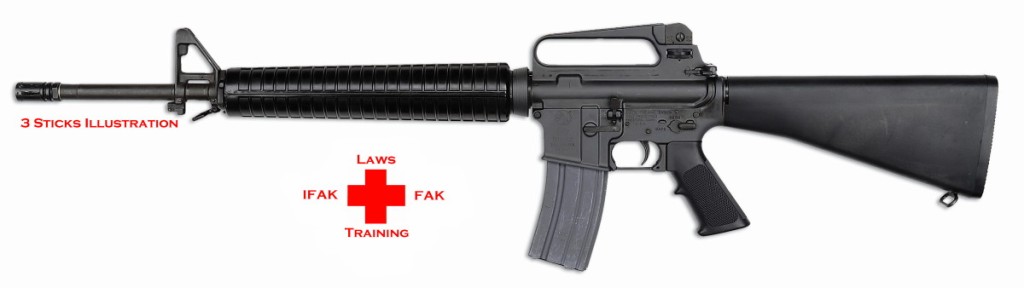
First Aid
This is in no way a tutorial or a substitute for professional medical instruction. As such you will only find recommended items. It is up to you to decide what items you choose to place in your IFAK/FAK and attaining the proper training in their use. This is merely an intro into basic first aid items and basic trauma first aid items one would find in an IFAK/FAK.
You are at the range, out in the desert or wherever you shoot. Maybe you are hunting, maybe you are responding to an Active Shooter. Either way, you take a bullet. How bad is it? Is it a steady bleed, is it pulsing with each beat of the heart? Is it in a limb? Is it in the torso? Guts or chest? Do you have an IFAK? Do you have any First Aid Kit?
Can you save your own life?
Can you save someone else’s?
If you work with or use guns in any fashion some basic life saving knowledge and equipment is a must. Notice I said, “Basic”. Nobody is expecting you to place a chest tube for that hemothorax. But that shouldn’t stop you from providing basic first aid in an emergency situation whether it is on yourself or someone else.
The first thing you will need is a means of carrying your supplies. There are a multitude of options out there for IFAK’s/FAK’s. You’ll have to decide which one you want to carry what you deem necessary. But wait, what is necessary?
Well before we can say what is necessary we need to break each kit into separate uses.
IFAK (Individual First Aid Kit)– This is a last-ditch kit that will most likely be used on YOU, by yourself or by someone with you.
FAK (First Aid Kit)– A larger bag that is used for treating multiple injuries and wounded. This kit will also have what is known as “Boo-Boo” items. These are Band-Aids and such.
My Range Bag with my IFAK and FAK. One attached to my Range Bag and one easily transportable.
IFAK
Your IFAK should have 1 minimum requirement. That requirement is to stop any major bleeding. We are talking about an IFAK to be carried with you in your use of firearms. We are talking about a Gun Shot Wound (GSW). Whether that GSW was inflicted on accident or on purpose is beside the point. Your ability to manage the aftermath is what matters. Some recommended items you will need are as follows.
Tourniquet: Talk about a bad day. A Tourniquet is used when you have an artery hit on a limb. When all else fails, a belt or rope with a stick can be used. *So much information on tourniquet use has come out of the GWOT and mass casualty events that you should have no trouble finding numerous resources on updated information and products.
Gauze: You will need a means of absorbing blood and stopping a bleed with direct pressure. Gauze is perfect for this. 4×4 gauze is a good size that is easy to carry.
Hemostatic Gauze: Items like Quik Clot and Celox have chemicals infused in the gauze that will cause the blood to clot rapidly thus reducing the bleeding time and amount of blood loss.
Chest Seal: A Chest Seal is used when the lung has been penetrated. The good old “sucking chest wound”. A Chest Seal blocks the “sucking” part from happening. The Chest Seal is an all-in-one item, and the HALO Chest Seal has been given the top nod (*This was from 2010, again, information regarding all these items and their uses is always being updated. Do your research and due diligence.)
Israeli Bandage: This is a wonderful dressing that can reduce the amount of items you may need to carry. It is an “all in one” pressure dressing.
Trauma Sheers: For cutting stuff off…
Gloves: Keep your hands clean if possible and reduce the risk of blood borne pathogens/disease.
Tape: If you can fit it but your other items may work in place of tape.
FAK
The First Aid Kit is similar to your IFAK but can be a tad bit larger and carry more items such as a “Boo Boo” items for treating minor cuts and scrapes… The FAK’s use is for treating multiple injuries or wounded and should have at least a few of each item in your IFAK plus some extras such as:
Tourniquet: More of them. So much information has come out in GWOT and mass casualty events that indicate that the tourniquet is number one item to carry. The more, the better.
Gauze: Lots more gauze, lots of it. 4×4’s and 2×2’s because direct pressure is best pressure and a way to secure them like…
Ace Bandage: or something similar like
Israeli Bandage: Yes, so good we will go over it again. In addition to a lot of extra gauze. Pack a few extra Israeli Bandages.
Tape: Should find a place as well. Again though, space dictating you may choose items that serve a dual function over tape.
Medications: Yes, medications. It’s not all about bleeding. Tylenol (Acetaminophen), Ibuprofen, Aspirin and Benadryl (Diphenhydramine) can be just as important as anything else.
Band-Aids: Because some cuts still bleed but an Israeli Bandage is a bit too much…
Thermal Blanket: Hypothermia? Shock? Always good to have one on hand if you have the room.
Yes, I repeated a few items that were already mentioned in the IFAK items but they are important enough to repeat anyway. Understand that you may not know how to use some of these items (and you should not use them without training). They are not necessarily to be used by you but on you by someone that knows how to use them.
One major item I haven’t mentioned yet is the most important of all IFAK must have items.
Cell Phone
Understand that an IFAK/FAK is only the initial step in keeping yourself or someone else alive until arrival of EMS and transport to a hospital. So as soon as you can make that call or have someone else make that call, MAKE IT! This needs to be a priority in line with “Stop the Bleeding, Keep’em Breathing”. Your entire goal in basic first aid is to keep an individual alive (and do no more damage) until EMS arrives on scene.
Many training outfits are beginning to offer basic Trauma First Aid. Do your research before signing up for just any class. Make sure the training company is reputable and is offering training that is applicable to your needs.
If you happen to be in Arizona I can without reservation recommend Independence Training for your basic First Aid and Trauma First Aid training needs.
Recommended Sites to Shop from:
*And I am sure there are so many more now in 2022. But when I wrote this, these were the main ones that were recommend.
Disclaimer: As said above, this is in no way a tutorial in first aid of any kind or a substitute for professional medical instruction. This is merely an overview of useful items to stock an IFAK/FAK with. Please seek out professional medical training and understand the laws in your state regarding rendering first aid. 3 Sticks Illustration is not liable for your gross negligence. Get yourself educated, get yourself trained by a professional. The items listed are for informational purposes only.
See the above disclaimer? Good Samaritan Laws provide some protection and differ by state. Typically, they cover only basic external, non-invasive care to stop bleeding etc. You can see I have left off a few items that are often talked about on the forums when IFAK’s come up. The use of these items falls outside the use and protection of the Good Samaritan laws. Do not put yourself in a position to be held liable and face jail time because you wanted to be the “tacticool” hero of the day and end up causing more damage. Leave such work to the licensed professionals.
*Training with firearms is an inherently dangerous activity.
*This post and the information herein, is for informational purposes only. Use at your own risk. Always follow the 5 rules of Firearms Safety when handling any firearm.
*If you like this content and would like to support the page you can do so here.
-
Origins of The 1 MOA All Day Challange (Redux)
Where did the 1 MOA (Minute of Angle) All Day Long Challenge come from and how did it start?
Well, I’ll tell ya!
Back around September 2012 while surfing AR15.com a gentleman came over from Snipershide.com and started a thread or a post asking folks to come over to Snipershide and compete in their 0.5 MOA competition. I read the thread and started an account over on Snipershide but as I remember it, it was only for scoped rifles, “Sniper Rifles”. Well, I did not and still do not own a scoped rifle in the “Sniper Rifle” category. So with that in mind I thought, “Why not have an all-inclusive 1 MOA Challenge on AR15.com”. After all, that’s where I spent most of my online time at anyway.
After asking smarter people than me about some details I drafted the 1st version of the “1 MOA All Day Long Challenge” on AR15.com. As you can imagine it didn’t get a lot of participation. People actually having to shoot their guns… Gross.
I let it die after being bombarded by people complaining about the rules. Apparently, those High Power folks are a little too fond of their jackets and gloves… After some time, another member asked me for permission to reuse my thread and I gave it. He ran it 2 cycles before he gave up on it. At that point another poster on AR15.com took the reins and is now the current caretaker of my original work. Both having done, and still doing a wonderful job by-the-way.
After having googled, “1 MOA All Day”, you can find quite a few offshoots on other websites. M4carbine.net had a poster take my thread word for word and posted it as his own, no credit given for my very own words. A handful of blogs have written articles regarding the challenge. On AR15.com there is now a Non-MOA challenge and even a handgun versions with the 25 MOA challenge.
I am going to let everyone in on the secret as to why I spent the time creating the “1 MOA All Day Challenge” as you see it today on AR15.com.
I did it because for one, I enjoy AR15.com and being a productive member of the site. Two, because so many people lie about what they are actually capable of. Three, to have a collection of rifles, barrels, twist, ammo, optics etc that could be looked at and see what patterns may occur in accurate/precise guns and good shooters. Fourth, and this was the biggest factor, to get people out shooting! To enjoy their guns and exercise that right! To see what they were actually capable of and find their limit with their rifles and practice to push past that limit!
These are the rules as I originally intended them to be:
This is the Official “How Good Are You” thread of AR15.com
What is it? It’s a challenge to all to prove how good you really are with a rifle! Not sometimes but consistently.
Keep it simple 5 shot groups, 5 groups per target
1 MOA = 100 Yards = 1.047″
––––––––-50 Yards = 0.5235″
––––––––-25 Yards = 0.26175″
REMEMBER this, all 5 groups of 5 shots must AVERAGE 1 MOA to make the list and claim the title of being a 1 MOA shooter.
Doing one .99″ group and four 1.5″ groups does not equal a 1 MOA shooter, it means you got lucky once and you are a 1.398 MOA shooter (assuming a 100 yard target)
This is a challenge but don’t be afraid to try it out and post, every possible rifle style has been listed with a category and a distance. It’s all in good fun and to be honest about your abilities.
With that in mind here are the rules.
1. ONE sheet of paper, 8.5”x11” preferred and it MUST HAVE ALL 5 targets.
Meaning 1 sheet of paper with FIVE targets. NO INDIVIDUAL TARGETS. THEY WILL NOT COUNT.
2. On that 1 sheet of paper with 5 targets you shoot 5 groups of 5 shots each. (In one day)
3. Each group is measured OUTSIDE GREASE RING TO OUTSIDE GREASE RING with calipers (preferred) or tape rule in inches. Then subtract the diameter of one bullet IE if you’re shooting a .223 and your 5 shot group measures 1.13″ you will subtract 0.224″ to get a group of 0.906″. If you are shooting a .22lr you will subtract 0.223″, for a 308 you will subtract 0.308″ (Remember- the more precise your measurement the better)
Some common measurements:
.172″ – .17 HMR
.223″ – .22 Short, Long, Long Rifle
.224″ – .223 Remington, .22 WMR, .22 Hornet
.243″ – .243 Winchester
.284″ – 7mm-08 Remington, 7mm Mag
.308″ – .308 Winchester, .30-06, .300 Mag
.311″ – 7.62×39 Soviet, .303 British
.338″ – .338 Mag
4. NO MECHANICAL REST/SLED, NO VICE OR SIMILAR DEVICE THAT SUPPORTS THE ENITRE RIFLE, NO SHOOTING JACKETS, NO STRAPPING THE GUN INTO ANYTHING, NO REAR SANDBAG OR REAR REST. SHOOTER MUST HAVE POSITIVE CONTROL OF RIFLE.
THE POINT IS TO SEE HOW GOOD YOU SHOOT, NOT HOW WELL YOU CAN MOUNT IT IN A MACHINE.
5. OK TO USE- Front sandbag, rest, ruck, bipod, rock with a hat, sling etc. on forearm of the rifle.
IE. Can NOT sandbag gun in place. Shooter must maintain positive control of rifle. No formed or V-shaped rests/bags
6. Shooting position is up to you, sitting, standing, prone.
7. Posting:
1st picture of target set at the range you are shooting. If you are shooting more than one rifle at the same range using the same pic is okay.
2nd picture with 5 groups of 5 shots each, next to them write down group size.
3rd picture with calipers (or tape rule) left in place over BEST group.
4th picture of rifle and shooting setup (ie. Sandbag, prone and so on). Post all 4 pics and also type in the post your 5 group sizes and what the average is. IE. .99”, 1.5”, 1.5”, 1.5”, 1.5” add them up, equals 6.99” and divide by five. So 6.99/5 = 1.398”
You can use the MOA formula, either way I will check the math and post the MOA on the result list.
MOA formula
How many MOA equal 2 inches at 200 yards?
(inches / yards) x 100 = MOA
(2 inches / 200 yards) x 100 = 1 MOA
Also type up specs of your rifle and ammo IE. Rem 700 with 168gr Federal SMK or Colt AR15 18″ with Wolf 55gr FMJ or AK with 125gr Hand Loads PLEASE INCLUDE AMMO USED
8. In each division you can only have your name up once per gun. Meaning that if you shoot the Iron Sight 22lr with your 10/22 and average a 1.65” group and let’s say place 4th. If you use that same gun and do worse, even if you would place better then someone else it will not count for your group. Best group counts.
Now if you then shoot Iron Sight 22lr with your M&P 15-22 and shoot better, say 1.25” average groups and place 2nd. Both that score and the 10/22 score will remain. Different guns will be allowed for different group rankings within a division. Best group counts.
This also goes for the 1 MOA list. Meaning only your best MOA will be ranked on the 1 MOA list BUT if you also shoot 1 MOA or less with a different rifle, that will also count, and your name will be added to the list for each different rifle you shoot 1 MOA or less with.
9. Remember, this is NOT a Bullseye challenge, it’s a Groups challenge.
10. Any and all ammo is fine I don’t care if you use Factory loads or your super secret Hand Load that Moses gave you.
11. Ties in average will go to the shooter with the smallest group.
Service Division (AR/AK/FAL/M1A1 etc style weapons)
Iron sights at 50 yards
Non-Magnified Optic at 50 yards
SPR Division (AR/AK/FAL/M1A etc WITH magnified optics)
100 yards
Bolt Division with magnified optics (any precision gun)
100 yards
And for cheapness a 22lr Division
Any 22lr rifle with iron sights at 25 yards
Any 22lr rifle with non-magnified optic at 50 yards
Any 22lr rifle with magnified optic at 50 yards
Any 22lr rifle with magnified optic at 100 yards
Misc Small Bore Division
Any .17HMR/.17HM2/.17Fireball/.22WMR/.22 Hornet etc etc etc with any sighting system (Irons/nonmagnified/magnified) at 100 yards
The original rules that I posted included the use of a small rear bag, no larger than a grapefruit that required the shooter to maintain constant pressure. The only reason I allowed that was because people complaining to me via IM and after asking some guys smarter than me, I conceded the rear bag. I never wanted it though.
The current version has an unlimited class and includes the rear bag from the original thread.
Unlimited Division
Catch-all class for anyone wishing to use a lead-sled, large sandbag set-up, or other assisting device prohibited from the other classes. 50yd minimum for non magnified optic rifles and 100 yd minimum for magnified optics of all calibers. Does not qualify you for MOA shooter list, but will be recognized as an MOA rifle owner. Furthermore, if you have shot the same setup and are listed in a class you will not be eligible for unlimited. Let’s not turn this into a full-blown bench rest shoot
It’s a great challenge and I encourage everyone to get out and shoot it and now you know the history behind it.
My friends over at Science of the Gun will be adding the challenge to their website as well.
So, can you shoot 1 MOA All Day?
*Correction- It was brought to my attention that the original Snipershide competition was a 0.5 MOA challenge, not 1 MOA. I confirmed this with one of my own threads at the time referencing the now deleted 0.5 MOA thread from the Snipershide member.
*This post and the information herein is for informational and educational purposes only. Use at your own risk. Always follow the 5 rules of Firearms Safety when handling any firearm.
*If you like this content and would like to support the page you can do so here.
-
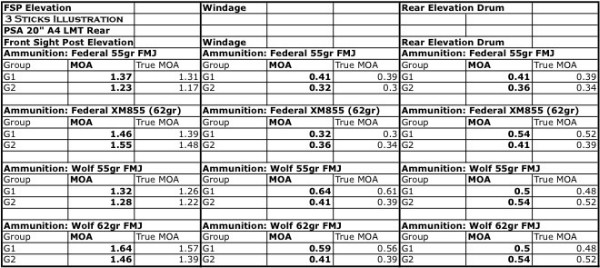
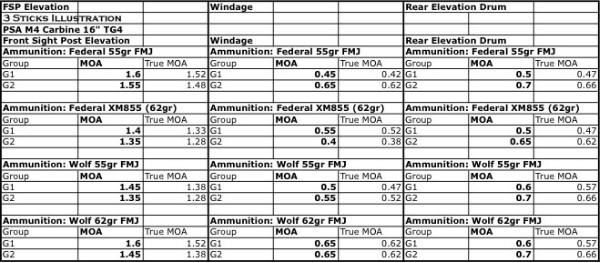
Basic Rifle Marksmanship (BRM) Series- MOA: Theory vs Reality (Redux)

In the pervious article on MOA I introduced you to the ever-complicated Minute of Angle. That article was geared towards getting you ready to zero your AR15 and begin to understand what the click adjustment values were for the different versions of the AR15. In it I gave you a multitude of numbers that were common agreed upon MOA approximate values. I also gave you “Exact” values and “Close Enough” values based on those approximates and different means of achieving them.
Those common agreed upon values came from the Marine Zero PDF, US Army Zero Guide and the Appleseed Instructor Manual (these were all active links but have since died). In that article I eluded to the fact that these were merely approximates multiple times and that was due to the various reasons sited. I also grouped the M4 Carbine and the 16” Mid Length gas systems together when technically they have a different sight radius, even if only by ~2”.
If you thought about it you’d realize that the longer sight radius of the 16” mid-length should have had a lower MOA click value everything else being equal. The Appleseed Instructor manual does state that the 16” AR’s have an approximate FSP MOA of 1.875 per click.
A comment was made regarding the M4 Carbine and the 16” Mid-Length being grouped together and while correct in theory, in practice it makes no difference and here is why.
MOA Theory vs. Reality
MOA Theory? Ok, Ok, MOA is not theory. It’s a scientific fact based on math. No questioning that. So what do I mean by MOA Theory in regards to the AR15? No, the AR15 doesn’t subvert science. Remember those approximate MOA click values we just talked about? Yep, those are what I am referring to when I say MOA Theory vs. Reality. In theory the A2 sights have a specific MOA click value just like the 16” Mid Length just like the M4 Carbine. But theory is an educated guess until you back it up with experience. Which leads us to…
MOA Reality. The reality is that those approximate MOA click values are only a starting point, like I stated in the MOA intro article. With the formula provided we are going to put these MOA click values to the test and see if “Theory” holds up with “Reality”.
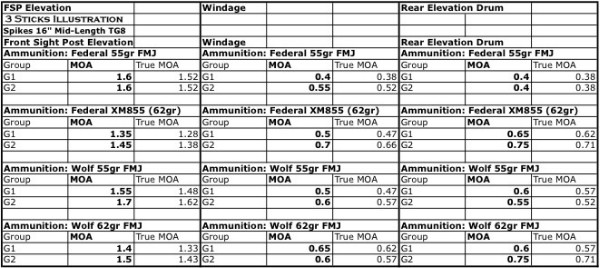
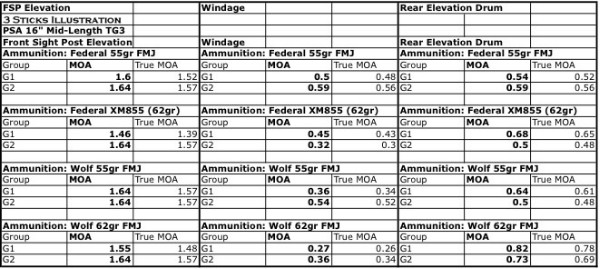
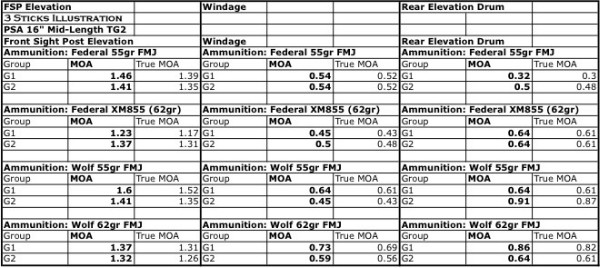
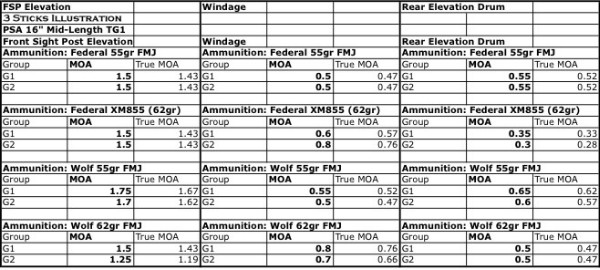
For this test we will be using multiple AR15’s, A2’s, A4’s, Mid Length 16” and M4 Carbines. We will be using different ammunition as well to see if this creates any variations in the supposed MOA click values. Some may argue that it shouldn’t as it’s based on sight radius, thread pitch etc. Of course it does, but what good is all that when your ammunition doesn’t agree with it in practice? This is why you must get out and shoot your guns and test this out for yourself.
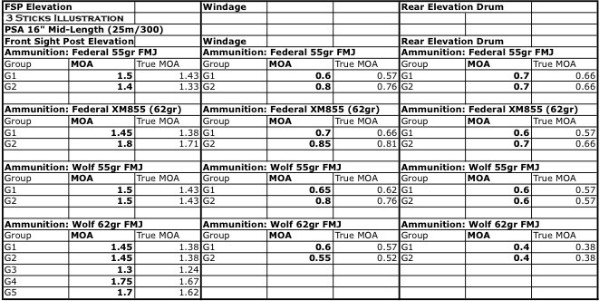
The testing will be done at 25 yards verified with a laser ranger finder and all groups will be shot from the supported prone. The click adjustments will be 10 clicks for all data points.
– Front Sight Post Elevation
– Windage
– Rear Elevation Drum
The formula to find MOA click value is as follows:
– Fire a 3 shot group
– Give the sight 10 clicks in adjustment
– Fire another group.
– Find the POI center of each group and measure that distance.
– Divide that measurement in inches by 10
– Divide that number by the MOA value at 25 yards
And before you start trying to pick holes in the method, no I did not use a lead sled nor clamp any of these guns in a vise. That is not reality.
MOA at:
25y = 0.25”
50y = 0.5”
100y = 1”
MOA True Value at:
25y = 0.26175”
50y = 0.5235”
100y = 1.047”
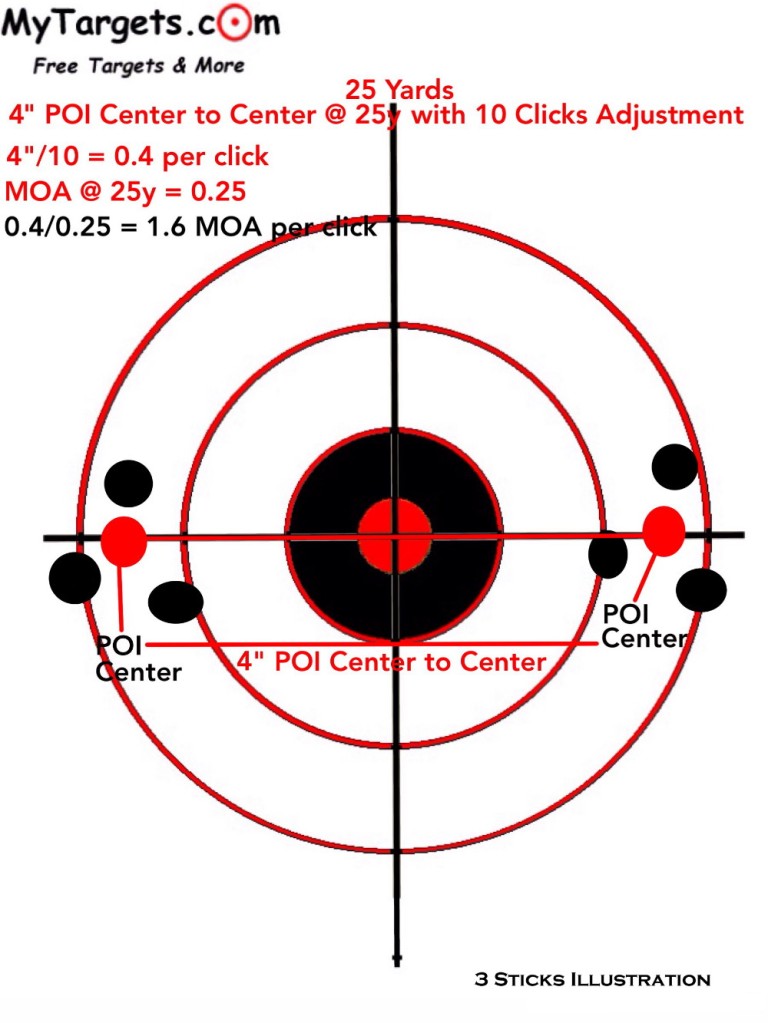
At 25 yards your POI center to POI center measures 4” on 10 clicks in adjustment.
4”/10 = 0.4 per click
MOA at 25y = 0.25
0.4”/0.25 = 1.6 MOA per click.
True MOA at 25y = 0.26175
0.4″/0.26175 = 1.5 MOA per click
Always have your tape measure when doing this type of work! Uh, what’s this “True MOA” you’re talking about now?
“True MOA” is simply the exact MOA at that distance and not the rounded/”shooters” MOA value. This really doesn’t matter for an Iron sighted AR15 but I simply want to introduce you to it as you may see this more often in scoped rifles. Plus I want to help show you why with these Iron sight values they are merely approximates. There’s that word again…
For this test I was lucky enough to have friends and family loan me their AR15’s to increase my sample size, a big THANK YOU to all of you guys!
Ammunition used:
Federal .223 55gr FMJ
Federal 5.56 XM855 62gr “Green Tip”
Wolf .223 55gr FMJ
Wolf .223 62gr FMJ
These are the more common types of ammunition used and honestly, all I had on hand in bulk quantities.
Lets get started!
The A2/A4– I only got my hands on 1 of each, shorter barreled AR’s are definitely easier to come by.
AR15 A2 AR15 A2
Theory A2

Reality A2
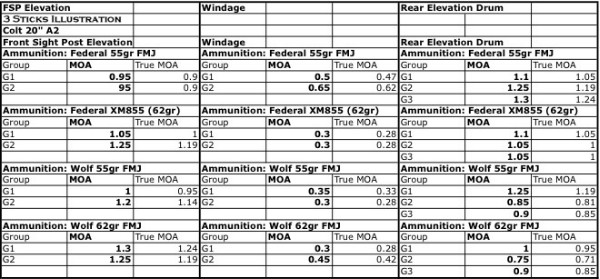
AR15 A4
Theory A4

Reality A4
The M4
I was able to get 5 M4’s to test, most with detachable carry handles, one had a Daniel Defense Rear BUIS.
Theory

Reality
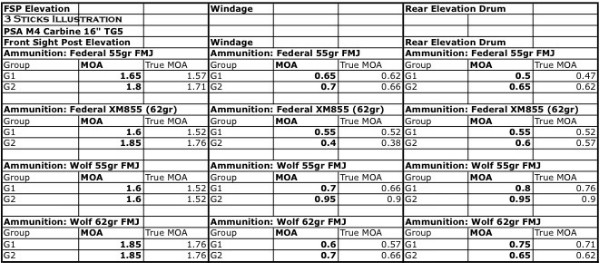
Here you see the fact that this DPMS M4 no longer stabilizes Wolf ammunition and started to have issues with XM855
Now for the DD Rear BUIS
Now for the 16″ Mid-Length AR15’s
Theory

1.875? Really?
Reality
And that’s it folks. I hope this has been somewhat enlightening for you and has helped get you out of the notion that everything must be perfect and precise. Remember these are service grade rifles with service grade Iron Sights shooting service grade ammunition and the only way to know what you and your rifle are capable of is by SHOOTING IT!
*This post and the information herein is for informational and educational purposes only. Use at your own risk. Always follow the 5 rules of Firearms Safety when handling any firearm.
*If you like this content and would like to support the page you can do so here.
-
Basic Rifle Marksmanship (BRM) Series- Don’t Chase Your Zero (Redux)
In the pursuit for perfection it can be easy to over think even the simplest of task, including zeroing your AR15.
Actually that is a lie. Zeroing the AR15 can be the most frustrating step in getting settled and for no other reason then our OCD rearing its ugly head. We want perfection; unfortunately we are working with an AR15 and not a Glock…
So the easiest way to avoid wasting ammo and increased blood pressure is simple.
Don’t Chase Your Zero
What do I mean by that?
Exactly that. Don’t chase your zero. Don’t continue to make slight adjustments after every 3 shot group. Once you make your first bold initial adjustment stay there for a few groups. Make sure that you are actually in need of adjustment. The variations in your group size, POA (Sight Picture) and POI can have you adjusting your sights all over the target if you let them.
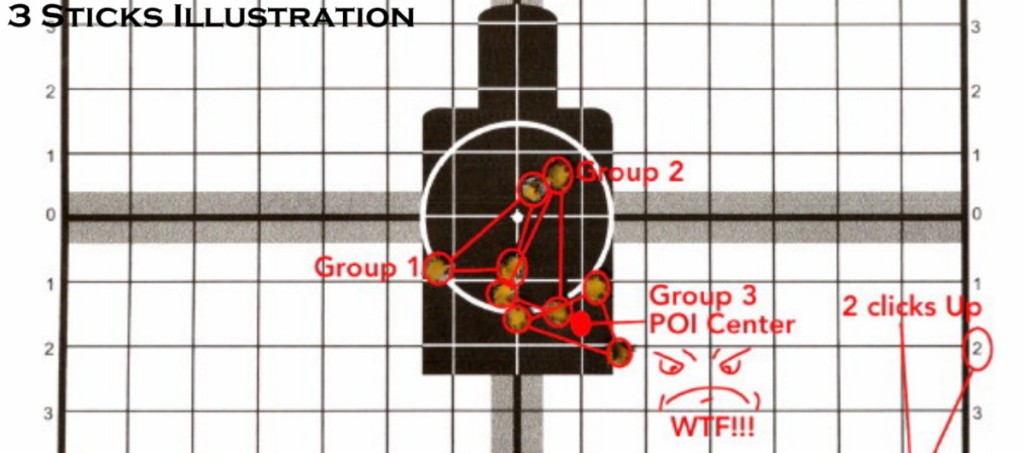
Here is an example of “Chasing The Zero”
Target 1 Group 1

Target 1 Group 2

Target 1 Group 3

Target 1 Group 4

Target 1 Group 5

Done!
Bull-eye 5 rounds confirmation group.

Dammit, lets fix this…
Target 2 Group 1

Target 2 Group 2

Target 2 Group 3

Target 2 Group 4

Getting messy
Target 3 Group 1
Target 3 Group 2

Target 3 Group 3

Ok, I think this is zeroed. Time to confirm.

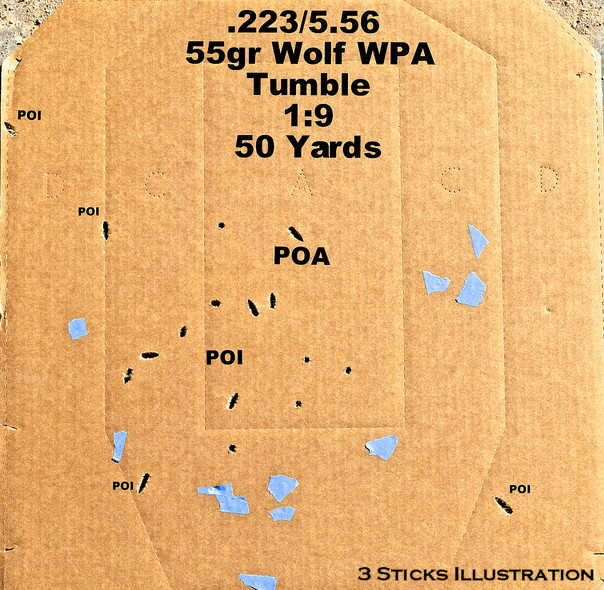
That’s with Wolf 55gr WPA Finally. Done.
It only took 41 rounds to do…
51 after a 10 round group to confirm it. Oh and look at that, it’s a 4 MOA group.
Can you do it in 9 rounds?
Targets can be found here.
*This post and the information herein is for informational and educational purposes only. Use at your own risk. Always follow the 5 rules of Firearms Safety when handling any firearm.
*If you like this content and would like to support the page you can do so here.
-
Basic Rifle Marksmanship (BRM) Series- Last Step Before Hitting the Range (Redux)

Last step before and after hitting the range!
MAN! Just let me shoot already!
Okay, but before you head out just do me this one solid. Have you ever done someone a solid? Either way… Just field strip your AR15 and clean away the packing grease/oil.
You’d be amazed at how many times this specific question comes up on gun forums by first time gun owners.
“I got this new gun. What do I do first”
Or my favorite.
New gun owner: “My new gun jammed, why?”
Old gun owner: “Did you clean it first and lube it up?”
New gun owner: “No, I don’t know how…”
So lets avoid that right from the get go and a word to the wise. Don’t over think your supplies.
What do you need?
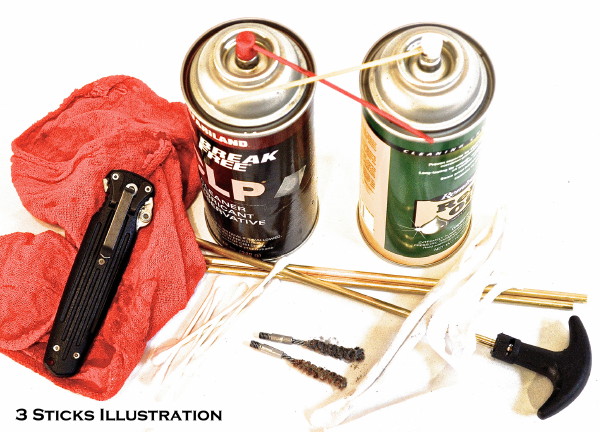
I use all the time 
I almost never use this. Only if my accuracy is degrading and I know it’s not me. – Cleaning rod made of plastic or brass that’s long enough to clean your barrel even if you have to go through the receiver. You’ll see way later.
– Bore brush for that caliber (an AR15 is a 22 cal brush)
– A cleaner of some kind (Personally I use Rem Oil and Breakfree CLP)
– A lead and copper remover (I use Butch’s Bore Shine but not very often)
– A crap load of patches some rags and more Q-Tips then you’d ever imagine
– A lube to finish it off (Personally I use Breakfree CLP on rifles- TW25b grease on pistols)
– Nitrile gloves (optional), I didn’t used to use them, I do now though.
You may find early on in your life with guns that you will want only the best for your prize possession. Is that Froglube, FireClean, Weapons Shield, Otis, Slip 2000, Slip 2000 EWL, Lucas, Wilson Combat Ultima LubeII, M-Pro 7 LPX, Hoppe’s, Butch’s gun Oil, Mil Com, Shooter’s Choice FP-10, Militech-1, Tetra Grease, Lubriplate, SEAL-1 CLP, Fire Clean, Breakfree CLP, Rem Oil CLP, WD-40, Mobile 1 (yes, motor oil) or any number of other cleaners and oils.
Here is the truth. People make a lot of money based on nothing more than your feelings and loyalty. That’s cool, I got nothing against that, capitalism rocks but understand this when it comes to parting with your hard earned cash. None of them are magic. Just pick one and use it. That’s it. Don’t over think it. Just pick one. I use the ones I use because I got tired of trying to over think it with no perceivable benefit to any particular brand. Breakfree CLP is cheap and works. Rem Oil I like for cleaning, it’s cheap and it works. I am not trying to break my bank on the next flavor of the month. My bottle of Butch’s Bore Shine is about 8 years old and will last another 8… I only use it if my accuracy begins to degrade.
After you’ve picked one, understand the following. Your gun doesn’t need to be cleaned as often as you think, especially your AR15. Against popular belief, your AR15 is extremely reliable, almost boringly so. Ever heard of the Filthy 14 ? (Now as high at 67,500 rds with no cleaning)!
And now I am going to contradict myself. If you are new to firearms and the AR15, field strip it and clean it before your first range trip and after every time you shoot. Why if I said that they don’t need to be cleaned that often?
Familiarization. If you are new to this, the more hands on you can be the more familiar you will be with your firearm. The more familiar you are with your firearm the more confidence you will have with it. The better you will be able to handle it if you have a malfunction of some kind. More on this later.
The AR15 is easy so lets start.
Make sure it’s empty, clear and safe like always.
Charge it. You need the hammer cocked to remove the upper receiver.
Place on safe.
Rear take down pin. Push it. Not all the way yet.
Front take down pin. Push it. Pull it all the way out until it locks.
Now go back and pull the rear take down pin all the way out until it locks.
With one hand on the upper receiver and one hand on the lower receiver, pull them apart. It may have a springy feeling to it. That’s fine; it’s the buffer and action spring pressing against the Bolt Carrier Group (BCG). It won’t go anywhere.
Now that it’s apart put the upper to the side.
Take the lower and your favorite cleaner/CLP. Now don’t over think this. Spray the inside of the lower receiver, the Fire Control Group (FCG) specifically. Just get it wet. Don’t worry about how much. Just wet it down and wipe it off. Once you have wiped off whatever was there take your favorite lube and give it a nice coat.
Hit the springs around the hammer and the disconnector. There is a tiny little spring in there. You can feel it if you press down on it.
Now that it is nicely oiled put it off to the side and grab your upper receiver.
Pull the Charging handle out and out comes the BCG. Put those to the side for a minute and we will wipe off the inside of the upper receiver. Just spray it and wipe it out. Done.
Now for the chamber and barrel. THAT IS NOT A STAR CHAMBER, it is a Barrel Extension.
Those cutouts that give it the “Star” name are where the lugs of the bolt fit through when it is in battery. This area can drive you crazy trying to get spotless. Just stop, you wont, don’t worry about it. Just take your chamber brush and shove it in there and spin it around. Pull it out and bend some Q-Tips and wipe away what you can. Don’t fret over it. (I have AR-15’s that have not been cleaned in over 3 years, only sprayed with CLP 3 years ago with ZERO rust after shooting steel case ammo. Think about that.)

Now for the barrel, replace that chamber brush with a bore brush and spray it or the barrel with your cleaner/CLP of choice. This next step is crucial. Always work from the breech to the muzzle. Avoid pulling the brush back through (though I do…). This is to protect the crown of the muzzle. If you ding or damage the crown you have put an imperfection in your barrel at the last place your bullet will touch as it leaves the barrel. This has the potential to cause major accuracy issues. Avoid it. Breech to muzzle.

Hit it a few times with a bare brush then swap it out to one with a small piece of cloth on it, soak it in your CLP and push it through a few times. Replace with a dry patch and give it a once through. Done. If leaving stored for an extended period of time, leave it wet with your oil of choice.
Next up and to finish this off is the Bolt Carrier Group (BCG) where you can spend a lot of time on after you shoot due to carbon build up. Good news is that this build up is self-limiting and doesn’t hinder the operation of the AR15.
I love Spikes BCG’s I start by, you guessed it, spraying it down and then wiping it off. Then I pop the cotter pin, drop the firing pin, rotate and remove the cam and then pull the bolt out. Easy right? Now spray it all down again especially the inside of the carrier. This area will get pretty dirty after shooting. Spray it and wipe it clean. Re oil it.
The bolt face and lugs are fairly easy; it’s the tail of the bolt that collects the carbon build up. After you shoot, you’ll see it. Just spray it and SCRAPE it off, I use a knife, but that’s just me. They actually make multiple tools you can buy to scrape it clean… Clean? Good, now re oil it.
Now that everything is clean of the packing grease/oil and you now have a little knowledge of where grime builds up while shooting, re oil it all and put it back together.
You are now ready to get out and shoot and when you are done, you will know how to field strip your AR15 and clean it up nice.
I promised a funny story once you finished this up. Here it is.
A few weeks (years now) ago I got a phone call from my brother asking me if I could help him put his Mossberg 835 12ga Shotgun back together. Sure. But the catch is, he is out hunting. He somehow managed to spin a shell completely around while trying to shoot some Quail. The only way to clear it was to take his shotgun apart. So he sends me these two pictures.
I call him back to walk him through it. No luck. The 835 (500 action) can be kind of tricky to get back together. So my brother lost his hunt and his morning because he couldn’t put his shotgun back together.
The kicker here is that for the last few years he had been asking to come over to have me teach him how to field strip that 835… Well, he came over that day and we put his shotgun back together. I won’t even tell you what his job in the Navy was…
Moral of that story? I think you know.
Don’t lose your hunt, your day at the range or your life because you don’t know how you fix your gun when it counts.
*This post and the information herein is for informational and educational purposes only. Use at your own risk. Always follow the 5 rules of Firearms Safety when handling any firearm.
*If you like this content and would like to support the page you can do so here.
-
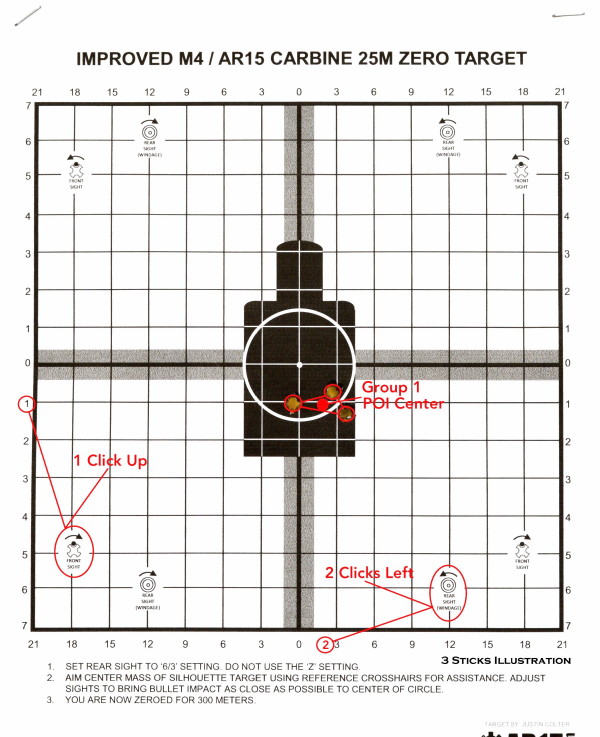
Basic Rifle Marksmanship (BRM) Series- How to Zero Your AR15 (Redux)
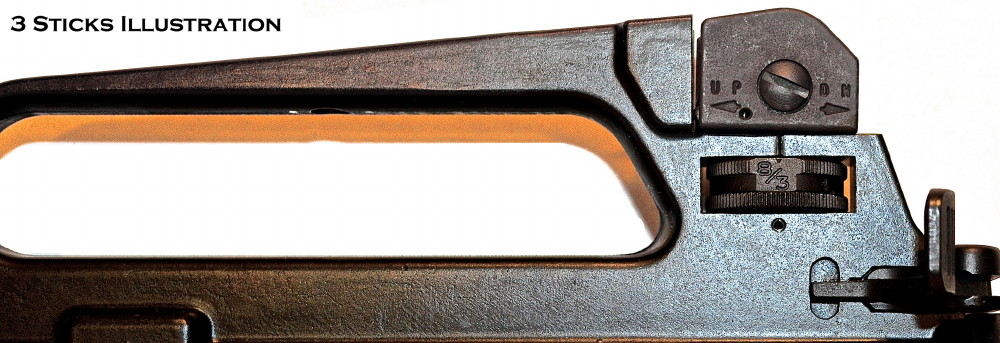
8/3, 6/3, cats crawling up trees, 5×5=25…
Easy there Tommy, it’s not as complicated as it seems. Of course this is zeroing your AR15 and you can make it as complicated as possible but that is up to you. Or, you can take a breath and read on and take the complication out of this process.
First step, clear your rifle and ensure it’s empty, clear and safe.
Tools you will need (any one of these will do):
– A small punch, a .223/5.56 bullet or a front sight tool.

We will now set the “Mechanical Zero”
Front Sight Post
Take your tool of choice from above and adjust your front sight so the base of the front sight post is flush with the shelf of the Front Sight Block. Usually, they come flushed out but if it didn’t, get to spinning. Front sight is done for now.

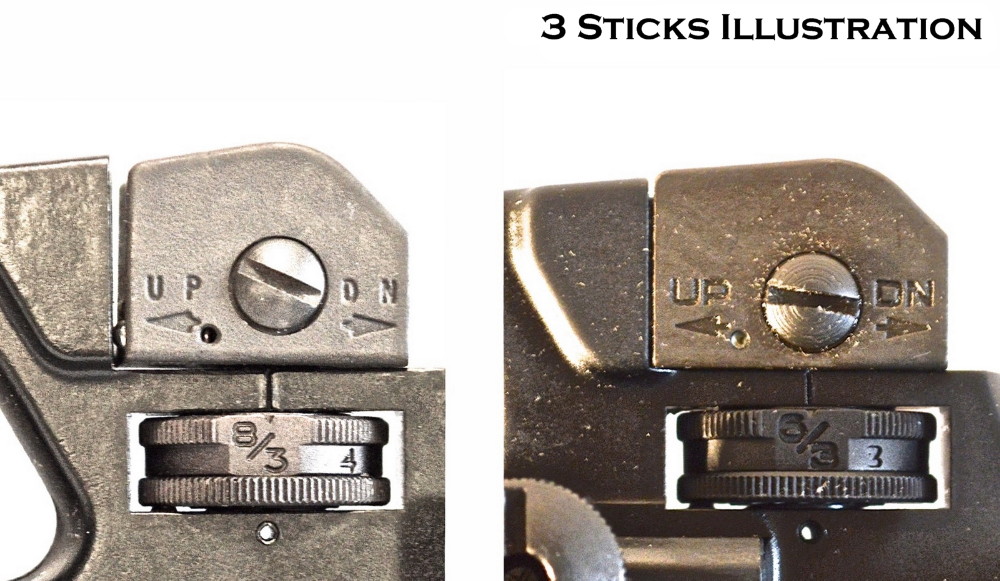
Rear Elevation Drum
Now the rear sight elevation is it 8/3 or 6/3 and what the hell does that mean?
Easy Tommy, this is easy.
8/3 stands for 800m/300m. Think of it as 8(00)/3(00).

6/3 stands for 600m/300m or 6(00)/3(00).

You will also see numbers 4, 5, 6 and 7 on an 8/3 and 4 and 5 on a 6/3 etched into the drum. These also correspond to their theoretical distance in meters when set at these marks.
But luckily that doesn’t matter right now. Simply spin it counter-clockwise until it is all the way down at the bottom and the flat of the 8/3 or 6/3 is lined up parallel with the Rear Sight Base. You will know because at the top of that elevation drum is an index line, it will be lined up with the index line etched underneath the Rear Sight Base. Done with the elevation drum for a minute.

Windage
Last up is the windage. Start by spinning it all the way to one side, does not matter which, just pick one and max it out. Once maxed out on your windage you will now spin it back to the opposite side counting each click until you hit the other side. Take that number and divide it by 2 and you’ll have the actual center of your windage. It’ll be somewhere around 80 clicks total. Mine range between 78 clicks to 88 clicks. Also understand that this is a “Mechanical Zero” and only means it’ll get you on paper at 25m/36y though it’s pretty close to good. As an example, my LMT A4 rear sight is 78 clicks with a “MZ” of 39 clicks. The actual zero is 43 clicks from right, plus 4 from MZ. My DPMS has 81 clicks and actual zero is at 42 clicks, pretty dang close.

A note here, if you find that you are having to make extreme windage adjustments to zero or even come close to zeroing your AR you may have a canted front sight. You’ll need to either replace your barrel or have the factory do it.
Now that your AR15 is set for a “Mechanical Zero” and you have some basic knowledge on MOA and the adjustments on your AR15’s sights it’s time to pick your distance.
You figured out which zero you wanted right? 25/300m? 36/300y? 50/200y?
How about this, we’ll do them all.
And because people get confused between the Army’s 25/300m zero, the Marine 36/300 yards zero and how to accomplish this… I am going to let you in on a little secret, but first.
The Army’s 25/300m zero
The Army has some very nice targets that tell you all the adjustments you will have to make to get you zeroed.
To start:
Set your M16/M4 target up at 25 meters (82’). If you are shooting an A2 adjust your rear elevation 8/3 drum up 1 click. If you are shooting an A4, adjust your rear elevation 6/3 drum up 2 clicks to the “Z” setting. If you are shooting an M4 leave your rear elevation 6/3 drum bottomed out flush on the 6/3(00) setting aligning the corresponding index marks on the elevation drum and the line etched under the rear sight base.

From a solid, supported prone, fire your 3 shot group and follow the instructions presented here. Once you are zeroed make sure you return your Rear Elevation Drum back to the 8/3(00) or 6/3(00) setting. You will now be zeroed at 300m, in theory, that is.
The Marine 36/300y zero
Ready for that little secret I mentioned earlier?
DO NOT ADJUST YOUR REAR ELEVATION DRUM.
That’s it. Leave it bottomed out flush on the 8/3(00) or the 6/3(00) setting aligning the corresponding index marks on the elevation drum and the line etched under the rear sight base. Set your target up at 36 yards and repeat the above steps.
That it! That is the main difference so please don’t confuse yourself with the distances between the Army’s 25m zero and the Marine 36 yard zero. It’s all in the initial setting on the rear elevation drum.
– 25m, adjust per A2 8/3 (1 click up)/A4 6/3 (2 clicks up “Z”)/M4 6/3 (no clicks up- Leave it bottomed out flush on the 6/3(00) setting aligning the corresponding index marks on the elevation drum and the receiver) settings.
– 36 yards, No clicks up- Leave it bottomed out flush on the 8/3(00) or the 6/3(00) setting aligning the corresponding index marks on the elevation drum and the receiver.
Regardless of your initial zero, the only way to know if you are zeroed at 300m/300y is to shoot at those distances.
You’ll notice I didn’t go over the 50/200 yard zero. Treat it the same way as the 36/300y zero. The main difference in the zeroing process is that I start at 25 yards. After obtaining the initial 25 yard zero I then move back to 50 yards to make my final adjustments.
*This post and the information herein is for informational and educational purposes only. Use at your own risk. Always follow the 5 rules of Firearms Safety when handling any firearm.
*If you like this content and would like to support the page you can do so here.
-
Basic Rifle Marksmanship (BRM) Series- What The Hell Is MOA (Redux)
What The Hell Is MOA…
And how does it apply to shooting and your AR15?
Well it’s kind of important, of course you don’t really need to know it. But you will waste a lot of ammo just trying to get your AR15 zeroed. So before we get to zeroing our AR15 we need to take a few and dive into Minute Of Angle (MOA) and in the process beef up on your math skills and your understanding of how your Iron Sights work.
This may look like a lot at first glance, but it really is not. Don’t let the numbers intimidate you. The point here is to show you that while your math may be very precise, your IRON SIGHTS may not be. So pick up a pencil and a calculator and discover how much rounding and “close enough” are involved. It really is easy, I promise!
Don’t worry; I’ll give you some easy tables to help in simplifying this bit of wizardry.
So what is a Minute of Angle (MOA)?
Simply put it’s a unit of measure. Specifically, it’s an angular unit of measure (talking circles here), 1/60th of 1 degree. Another way to say it is that there are 60 minutes in one degree and we are looking at one minute in that degree, 1/60th, a pretty small number.
Officially 1 MOA = 1.047” at 100 yards
Unofficially 1 MOA = 1” 100 yards
Good news is we don’t care about the official number. Here is why, at 1000 yards the size of our circle is only 0.47” larger than if we just round our MOA to 1” at 100 yards.
Here are some fancy visuals to help.
Official MOA

Unofficial MOA

4 MOA (The AR15 is no worse than a 4 MOA rifle)
Can you see how little the difference there is? I hope so because you will begin to see a trend throughout the rest of this article. Now lets get into how this effects us when zeroing our AR15.
To start off we will go over the most common zero distances, the Army 25m, the Marine 36y and the 50 yards. We will go over the how and why each click equals what it does at distances closer than 100 yards.
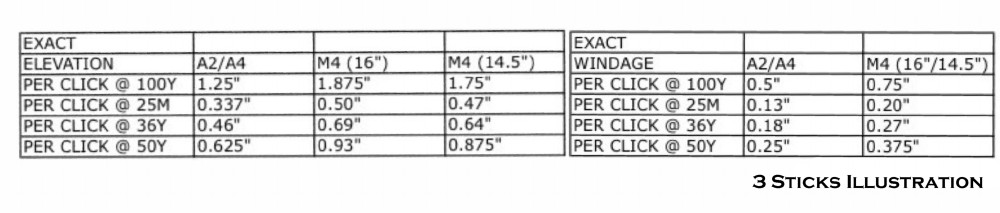
To start we need the base MOA values of the AR15/M16 A2/A2/M4 (16”)/M4 (14.5”):
If your AR is patterned after a M16A2, meaning it has a 20” barrel and a fixed carry handle (8/3 rear elevation drum), the sight adjustments values are as follows:
8/3 Rear Elevation Drum Front Sight: ~1.25 MOA (meaning each click will move the impact of the bullet roughly 1.25” up or down at 100 yards)
Windage Knob: ~0.5 MOA (meaning each click will move the impact of the bullet roughly 0.5” left or right at 100 yards)
Elevation Drum: ~1 MOA (meaning each click will move the impact of the bullet roughly 1” at 100 yards)
Why are these approximate? This is due to the differences in the actual front sight post measurements, sight radius etc. The MOA adjustments can get very complicated if you try and be too exact. Remember, these are IRON sights, not optics. Think of all these values as “Close Enough”.
If your AR15 is patterned after an M16A4, meaning it has a 20” barrel and a flat top upper receiver with a detachable carry handle (6/3 rear elevation drum) then the sight adjustments values are as follows:

That’s an LMT rear but it’s still a 6/3 drum Front sight: ~1.25 MOA
Windage Knob: ~0.5 MOA
Elevation Drum: ~0.5 MOA*
*Do you see the difference in MOA between the A2 8/3 drum and A4 6/3 drum? This is due to the difference in thread pitch of the rear sight base.
If your AR15 is patterned after an M4, meaning it has a 16” barrel* and a detachable carry handle (6/3 rear elevation drum) then the sight adjustments values are as follows:
Front Sight: ~1.875 MOA
Windage Knob: ~0.75 MOA
Elevation Drum: ~0.75 MOA
* The military M4 has a 14.5” barrel and you as a civilian cannot. Well you can but that’s a different discussion. Before you get into NFA (National Firearms Act) items and Short Barreled Rifles (SBR’s) as short as legally allowed is a 16” barrel, or a 14.5” barrel with a pinned flash suppressor equaling 16”. Also understand that the M4 is also referencing the notches cut into the barrel, “M4 cuts” which serve the purpose to attach an M203 grenade launcher to it.
*Another point of clarification here, I am lumping the M4 (16”) and all 16” “Mid Length” gas systems into this category. It may not be exact, but the point here is to also show you, that none of this is actually all that exact anyways.
For a 14.5” AR15 (M4 style- SBR or Pinned Flash Suppressor) with a detachable carry handle (6/3 rear elevation drum) the sight adjustment values are as follows:
Front Sight: ~1.75 MOA
Windage Knob: ~0.75 MOA
Elevation Drum: ~0.75 MOA
So these are the values we’ll use.

You will see the math for Exact numbers and “Close Enough” numbers. The reason for this is to help you see how little the difference actually is.
Army 25m Zero
A2/A4 25m Zero Target

M4 25m Zero Target

These targets can be found here.
Exact math:
To start with the Army Target at 25m
To get the values for each click at 25m
25m = 27y
100y/27y = 3.7 (This is our constant for 25m)
Close Enough Math:
25m is close enough to 25y
100/25 = 4 (this is our “close enough” constant)
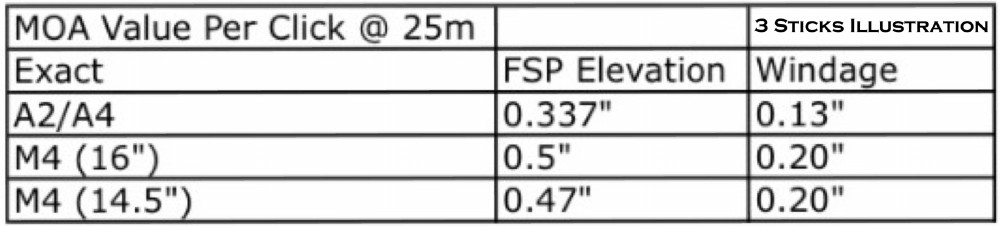
Elevation Exact
A2/A4
1.25 MOA = 1.25” at 100y
1.25”/3.7 = 0.337” per click at 25m
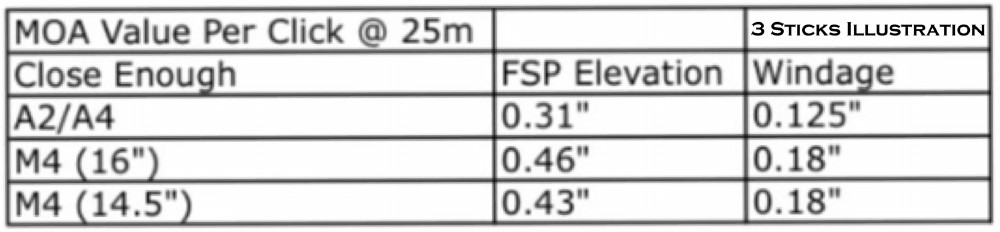
Close Enough
A2/A4
1.25 MOA = 1.25” at 100y
1.25”/4 = 0.31” per click at 25m
Exact
M4 (16”)
1.875 MOA = 1.875” at 100y
1.875”/3.7 = 0.50” per click at 25m
Close Enough
M4 (16”)
1.875 MOA = 1.875” at 100y
1.875”/4 = 0.46” per click at 25m
Exact
M4 (14.5″)
1.75 MOA = 1.75″ at 100y
1.75”/3.7 = 0.47” per click at 25m
Close Enough
M4 (14.5”)
1.75 MOA = 1.75” at 100y
1.75/4 = 0.43” per click at 25m
Windage Exact
A2/A4
0.5 MOA = 0.5” at 100y
0.5”/3.7 = 0.13” per click at 25m
Close Enough
A2/A4
0.5 MOA = 0.5” at 100y
0.5”/4 = 0.125” per click at 25m
Exact
M4 (16”/14.5”)
0.75 MOA = 0.75” at 100y
0.75”/3.7 = 0.20” per click at 25m
Close Enough
M4 (16”/14.5”)
0.75 MOA = 0.75” at 100y
0.75/4 = 0.18” per click at 25m
Exact MOA at 25m
Close Enough MOA at 25m
Time to apply
Note- When numbers fall between 2, error on the lower click value (usually). Fire a 3 shot group and adjust again if needed.
Elevation
If we are 2” low at 25m?
Exact
A2/A4
2″/0.337 = 5.9 = 5-6 clicks (Matches A2/A4 Zero target)
Close Enough
A2/A4
2”/0.31 = 6.4 = 6 clicks
Exacts
M4 (16”)
2”/0.5 = 4 clicks (Matches the M4 Zero target)
Close Enough
M4 (16”)
2”/0.46 = 4.3 = 4 clicks
Exact
M4 (14.5”)
2”/0.47 = 4.25 = 4 clicks (Matches M4 Zero target)
Close Enough
M4 (14.5”)
2”/0.43 = 4.6 = 4-5 clicks
Windage
If we are 1.5” right at 25m?
Exact
A2/A4
1.5”/0.13 = 11.5 = 11-12 clicks (Matches A2/A4 Zero target)
Close Enough
A2/A4
1.5”/0.125 = 12 clicks
Exact
M4 (16”/14.5”)
1.5”/0.20 = 7.5 = 7-8 clicks (Matches M4 Zero target)
Close Enough
1.5”/0.18 = 8.3 = 8-9 clicks
A2/A4

M4

Do you want a 3rd way?
You can always take the distance from our “POI center” from the POA center and multiply that by either our Exact constant or “Close Enough” constant for our given distant to extrapolate what our POI center would be at 100 yards and use our true MOA values. Confusing? Lets break it down in numbers to make this easier.
Elevation Exact
2” at 27y = 2”x3.7 = 7.4” at 100 yards
A2/A4
7.4”/1.25 = 5.92 = 5-6 clicks
M4 (16”)
7.4”/1.875 = 3.9 = 4 clicks
M4 (14.5”)
7.4”/1.75 = 4.22 = 4-5 clicks
Close Enough
2” at 25m = 2”x4 = 8” at 100 yards
A2/A4
8”/1.25 = 6.4 = 6 clicks
M4 (16”)
8”/1.875 = 4.2 = 4-5 clicks
M4 (14.5”)
8”/1.75 = 4.5 = 4-5 clicks
Windage Exact
1.5” at 27y = 1.5”x3.7 = 5.55” at 100 yards
A2/A4
5.55”/0.5 = 11.1 = 11-12 clicks
M4 (16”/14.5”)
5.55”/0.75 = 7.4 = 7-8 clicks
Close Enough
1.5” at 25m = 1.5”x4 = 6” at 100 yards
A2/A4
6”/0.5 = 12 clicks
M4 (16”/14.5”)
6”/0.75 = 8 clicks
A2/A4

M4
Here is a work sheet provided to me by Roger Lomshek which may help you with this 3rd method.
See if you can get the same numbers?

Marine 36y Zero Target
You can see how this target rounds all the elevation adjustments.

This target can be found here.
Exact
100y/36y = 2.7 (this is our constant)
Close Enough
36 is close enough to 1/3rd of 100 which is close enough to 3 (this is our “Close Enough” constant).
Elevation Exact
A2/A4
1.25 MOA = 1.25” at 100y
1.25”/2.7 = 0.46” per click at 36y
Close Enough
A2/A4
1.25 MOA = 1.25” at 100y
1.25”/3 = 0.41” per click at 36y
Exact
M4 (16”)
1.875 MOA = 1.875” at 100y
1.875”/ 2.7 = 0.69” per click at 36y
Close Enough
M4 (16”)
1.875 MOA = 1.875” at 100y
1.875”/3 = 0.62” per click at 36y
Exact
M4 (14.5″)
1.75 MOA = 1.75″ at 100y
1.75”/2.7 = 0.64” per click at 36y
Close Enough
M4 (14.5”)
1.75 MOA = 1.75” at 100y
1.75/3 = 0.58” per click at 36y
Windage Exact
A2/A4
0.5 MOA = 0.5” at 100y
0.5”/2.7 = 0.18” per click at 36y
Close Enough
A2/A4
0.5 MOA = 0.5” at 100y
0.5”/3 = 0.16” per click at 36y
Exact
M4 (16”/14.5”)
0.75 MOA = 0.75” at 100y
0.75”/2.7 = 0.27” per click at 36y
Close Enough
M4 (16”/14.5”)
0.75 MOA = 0.75” at 100y
0.75″/3 = 0.25” per click at 36y
Exact MOA at 36y

Close Enough MOA at 36y
Time to apply
Elevation
If we are 3.5” low at 36y
Exact
A2/A4
3.5”/0.46 = 7.6 = 7-8 clicks (36y Zero targets claims 7 clicks for the A2/A4/M4, claiming 0.5” per click at 36y)
Close Enough
3.5”/0.41 = 8.5 = 8-9 clicks
Exact
M4 (16”)
3.5”/0.69 = 5 clicks
Close Enough
M4 (16”)
3.5”/0.62 = 5.6 = 5-6 clicks
Exact
M4 (14.5”)
3.5”/0.64 = 5.4 = 5-6 clicks
Close Enough
M4 (14.5”)
3.5”/0.58 = 6 clicks
Windage
If we are 1.5” left at 36y?
Exact
A2/A4
1.5”/0.18 = 8.3 = 8-9 clicks (36y Zero target claims 9 clicks for the A2/A4 claiming 0.5” per every 3 clicks, 3 clicks = 0.5”)
Close Enough
A2/A4
1.5”/0.16 = 9.3 = 9-10 clicks
Exact
M4 (16”/14.5”)
1.5”/0.27 = 5.5 = 5-6 clicks (36y Zero target claims 6 clicks for the M4 claiming 0.75” per every 3 clicks, 3 clicks = 0.75”)
Close Enough
M4 (16”/14.5”)
1.5”/0.25 = 6 clicks
Ready to try the 3rd way again? What was it again?
You can always take the distance from our “POI center” from the POA center and multiply that by either our Exact constant or “Close Enough” constant for our given distant to extrapolate what our POI center would be at 100 yards and use our true MOA values. Confusing? Lets break it down in number to make this easier.
Elevation Exact
3.5” at 36y = 3.5”x2.7 = 9.45” at 100 yards
A2/A4
9.45”/1.25 = 7.56 = 7-8 clicks
M4 (16”)
9.45”/1.875 = 5 clicks
M4 (14.5”)
9.45”/1.75 = 5.4 = 5-6 clicks
Close Enough
3.5” at 36y = 3.5”x3 = 10.5” at 100 yards
A2/A4
10.5”/1.25 = 8.4 = 8-9 clicks
M4 (16”)
10.5”/1.875 = 5.6 = 5-6 clicks
M4 (14.5”)
10.5”/1.75 = 6 clicks
Windage Exact
1.5” at 36y = 1.5”x2.7 = 4.05” at 100 yards
A2/A4
4.05”/0.5 = 8.1 = 8-9 clicks
M4(16”/14.5”)
4.05”/0.75 = 5.4 = 5-6 clicks
Close Enough
1.5” at 36y = 1.5”x3 = 4.5” at 100 yards
A2/A4
4.5”/0.5 = 9 clicks
M4 (16”/14.5”)
4.5”/0.75 = 6 clicks

50 yards BullsEye

Target can be found here.
Enough with targets that give you number. What about a generic bullseye at 50 yards?
Lets get our constant, this one is easy. We are working only in yards and in whole numbers.
Exact
100y/50y = 2 (this is our constant)
Close Enough
Ha, don’t need it this time! It’s all exact!
Elevation Exact
A2/A4
1.25 MOA = 1.25” at 100y
1.25”/2 = 0.625” per click at 50y
Exact
M4 (16”)
1.875 MOA = 1.875” at 100y
1.875”/2 = 0.93” per click at 50y
Exact
M4 (14.5″)
1.75 MOA = 1.75″ at 100y
1.75”/2 = 0.875” per click at 50y
Windage Exact
A2/A4
0.5 MOA = 0.5” at 100y
0.5”/2 = 0.25” per click at 50y
Exact
M4 (16”/14.5”)
0.75 MOA = 0.75” at 100y
0.75”/2 = 0.375” per click at 50y
MOA at 50y

Time to apply
Elevation
If we are 0.75” low at 50 yards?
Exact
A2/A4
0.75”/0.625 = 1.2 = 1 click
Exact
M4 (16”)
0.75”/0.93 = 0.8 = 1 click
Exact
M4 (14.5”)
0.75”/0.875 = 0.85 = 1 click
Windage
If we are 2.25” right at 50 yards?
Exact
A2/A4
2.25”/0.25 = 9 clicks
Exact
M4 (16”/14.5”)
2.25”/0.375 = 6 clicks
What about the 3rd way here?
You can always take the distance from our POI from the POA center and multiply that by either our Exact constant or “Close Enough” constant for our given distant to extrapolate what our POI center would be at 100 yards and use our true MOA values. Confusing? Lets break it down in number to make this easier.
So this is simple right?
Elevation
0.75” at 50y = 0.75″x2 = 1.5” at 100 yards
A2/A4
1.5”/1.25 = 1.2 = 1 click
M4 (16”)
1.5”/1.875 = 0.8 = 1 click
M4 (14.5”)
1.5”/1.75 = 0.85 = 1 click
Windage
2.25” at 50y = 2.25”x2 = 4.5” at 100 yards
A2/A4
4.5”/0.5 = 9 clicks
M4 (16”/14.5”)
4.5”/0.75 = 6 clicks
Now in the end understand that all the above is merely a place to start for a basic understanding. If you really want to get your MOA for your specific rifle here is how you do it.
Pick a distance that you can shoot tight enough groups to reduce shooter error.
- Fire a 3 shot group
- Give the sight (do each sight separate) 10 clicks in adjustment
- Fire another group.
- Find the POI center of each group and measure that distance.
- Divide that measurement in inches by 10 (the amount of clicks you chose)
- Divide that number by the MOA value at that distance you shot at.
MOA at:
25 = 0.25”
50 = 0.5”
100 = 1”
If you shot at 50 yards and your distance between groups is 5″ for 10 clicks in adjustment then our math looks like this:
5″/10 clicks = 0.5″ per click
Since we know 1 MOA at 50y = 0.5″, we divide 0.5″ (change per click) by 0.5” (1 MOA at 50y) and get the MOA value per click of your rifle.
0.5”/0.5 = 1 MOA per click.
Another example
At 25 yards your POI center to POI center measures 3” on 5 clicks in adjustment.
3”/5 = 0.6 per click
MOA at 25y = 0.25”
0.6”/0.25 = 2.4 MOA per click
Since math is all about repetition here is one more.
At 25 yards your POI center to POI center measures 4” on 10 clicks in adjustment.
4”/10 = 0.4 per click
MOA at 25y = 0.25
0.4”/0.25 = 1.6 MOA per click.
That’s it!!!
After all that math, you did all that math right? Here are some easy tables for you.
Exact Elevation/Windage
Close Enough Elevation/Windage

Some extra worksheets provided by Roger Lomshek
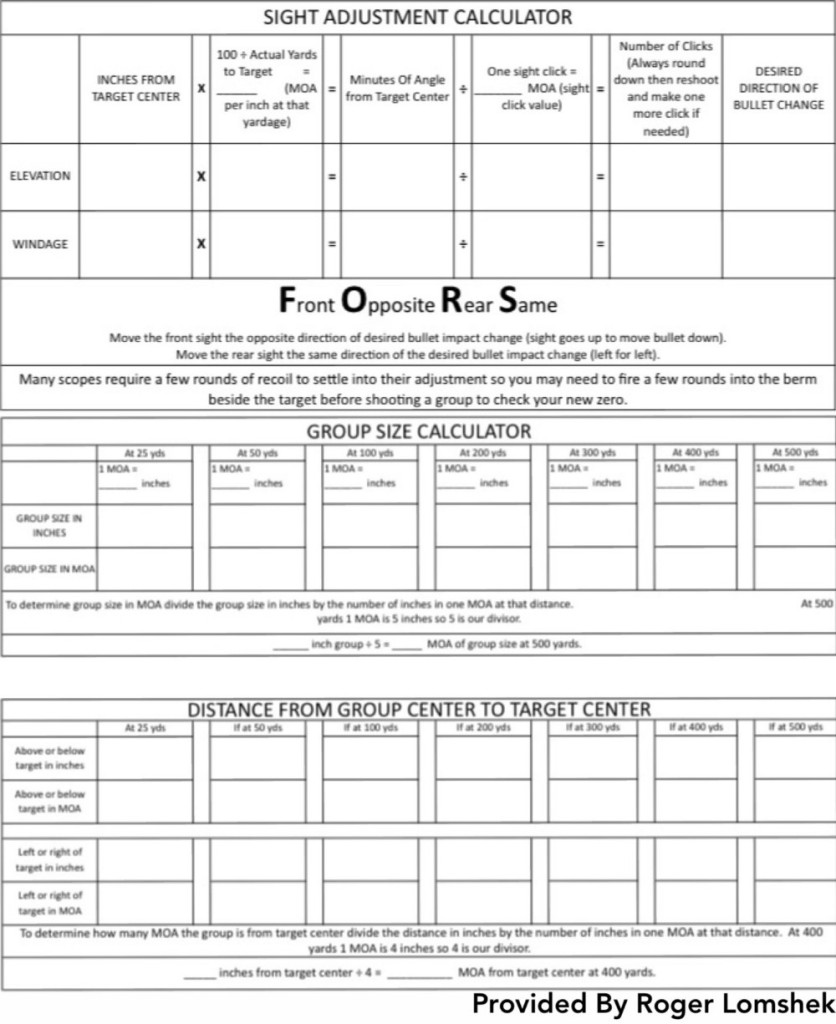
I would also like to thank Roger, he is a Appleseed instructor and my backstop as I bounced my numbers etc off of him. Also provided the math on acquiring your exact MOA value. Much appreciated!
*This post and the information herein is for informational and educational purposes only. Use at your own risk. Always follow the 5 rules of Firearms Safety when handling any firearm.
*If you like this content and would like to support the page you can do so here.
-
Basic Rifle Marksmanship (BRM) Series- Twists and Zeros (Redux)

Now that we have finished reviewing all those Shooting Positions we need to Zero our rifle. But before we can zero our rifle we need to choose a zero. Easy right…
Well, there are a number of different zeros you can choose from and with the AR15, even more so. To complicate this matter you will also need to choose a load that is stable for your given rifling twist rate…
In the Basic Rifle Marksmanship (BRM) Series– you may remember a mention of the different zeros. We will get a little more in depth with those. I will place my disclaimer here, I am not a scientist, I am a shooter. There are a multitude of resources on ballistics and zeros all over the Internet. I will give a brief run down on the different zeros. If you want more information, I will point you in the right direction. Believe me, this can get very complicated if you want it to, so this is as basic as it gets.
To start we will talk briefly about your barrels rifling twist rate. Your barrel should have the twist rate etched or stamped somewhere on it visible to you. It will most likely have what the barrel is chambered for next to the twist rate.

Why is this important? The AR15 can be chambered in a multitude of different calibers for one but in general we will assume you have one chambered 5.56x45mm. Why is this important to know? Because .223cal (.223 Remington) and 5.56 are often used interchangeably but hear me now, they are NOT the same (Well, they kind of are).
The “throat” of a 5.56 chamber is slight longer than a .223 and the 5.56 is loaded to a higher pressure. This is important to know incase your AR15 states it’s chambered in .223cal and NOT 5.56. So what does this mean to you? It means that you CAN shoot .223 in a barrel chambered for 5.56 but YOU CAN NOT shoot 5.56 in a barrel chambered in .223cal. (Yes, this is an oversimplification but if you are new to shooting just start here and as you learn more, which I hope you do, you will see where I simplified certain topics, including this one. More can be found here and here regarding this topic.)
Back to twist rate, what is yours? 1:14, 1:12, 1:9, 1:8 or 1:7? What does this mean? Simply put it is how many inches it takes for your bullet to make a full revolution in inches while traveling down the barrel. ie. 1 revolution in 14 inches, 1 revolution in 12 inches, 1 revolution in 9 inches etc. What effect does this have on our bullet choice? Certain twists lend themselves to certain bullet weights (measured in grains = gr) in order to stabilize them in flight. Meaning that they fly straight with a nice spiral and not tumbling end over end or lose too much accuracy.
Key hole- What happens when the bullet is not stabilized by the rifling Here’s an over simplified break down of twist rates and bullets they should typically stabilize.
1:14- 52gr and less, 55gr is pushing it, ideally you probably want something in the 36-45gr range (If you actually somehow have an AR15 in 1:14 twist buy a new barrel in a standard twist, you somehow managed a specialized varmint barrel…) Fun Fact: 1:14 was the twist the military initially adopted but quickly moved to the 1:12.
1:12- 60gr and less, some say you can get away with 62gr, most say 55gr and less with “ideal” being around 40gr. (If you have a 1:12 it’s typically an AR15 built for varmint hunting where light and fast bullets are the norm)
1:9- 55gr-69gr is the standard but many 1:9 barrels can handle weights up to 77gr. The 1:9 is the start of the versatile twist rates and a very popular twist for the AR15 on the civilian market. This also shows where once again, you need to test different weight bullets in YOUR AR15 to see what works.
1:8- 55gr-77gr and some even say 80gr (but can your AR feed that?). The 1:8 is “probably” the most versatile of twist and is growing in popularity.
1:7- 62gr-77gr-MilSpec baby! It can typically handle 55gr (depending on barrel length) and even 90gr though those 90gr will need to be hand loaded one at a time… This is the current twist in use with the military.
Understand that all these twist and bullet weights are a starting point for you to pick an appropriate load to start with (55gr cough*). You can experiment all you want with any bullet weight and see what works best in YOUR AR15.
Now we will again cover the trajectory of a bullet in its most simple form. A bullet is not a laser. It does not fly in a straight and flat line. It NEVER rises after it leaves the barrel. It instead immediately begins to fall to earth due to the effects of gravity. Just like throwing a ball, we angle our throw up into the sky in order to have the ball fall back to the ground at the point we would like it to hit. The same thinking can be applied to how bullets fly. With the aid of our sights we are angling our barrel up from our line of sight to fire our bullet up into the sky with the desired result of hitting our target at a specific point in our bullets trajectory.
(Photo credit ZRXC77)
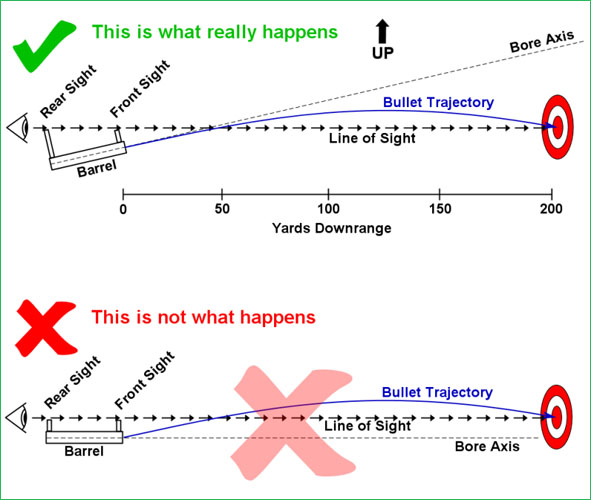
This trajectory has a Maximum Ordinate (or arc) of travel, which the bullet will reach and then start to fall back to the ground. The height of this Maximum Ordinate (max arc) will depend on your zero, ammunition used and height of your sights. To further understand this arc you may recall that I mentioned previously that in that trajectory your rifle will have roughly 2 zeros, a “Near-Zero” (bullet traveling up to its max ordinate) and a “Far-Zero” (bullet traveling down from its max ordinate). This is where the Max Ordinate in that bullets trajectory comes into play when deciding which zero to choose for your AR15. The Internet is full of debates on which zero is the best zero for the AR15. The smart response is always, “What are you going to use the rifle for?” or “What distance do you plan on shooting at the most?”, and the debate rages on.
Lets make note right here that if you zero for the near distance this does not in fact mean you are exactly zeroed at your far distance. Shooter error that is not noticeable at the near zero/distance may be severely off at the far zero/distance. So when zeroing, understand that the only way to truly know your zeros and holds at any given distance you have to in fact, shoot at those distances. Further more, the details of your AR15 and the ammunition you use will also dictate the reliability of these zeros. Meaning if you use a 20” AR15 with M193 55gr ammo it will not be the same as a 16” AR15 shooting 75gr ammo even if both are zeroed at 50 yards. This does not mean they will both intersect at 200 meters at the Far-Zero.
But, there is always a but, it’s close enough for government work…
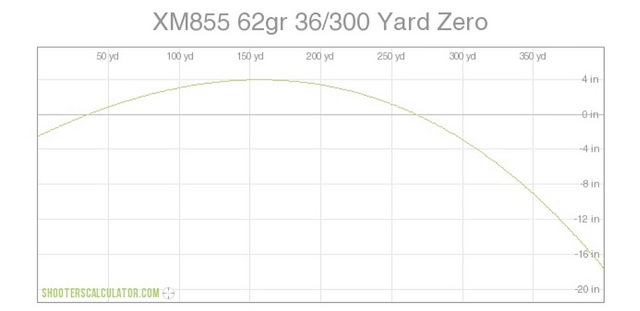
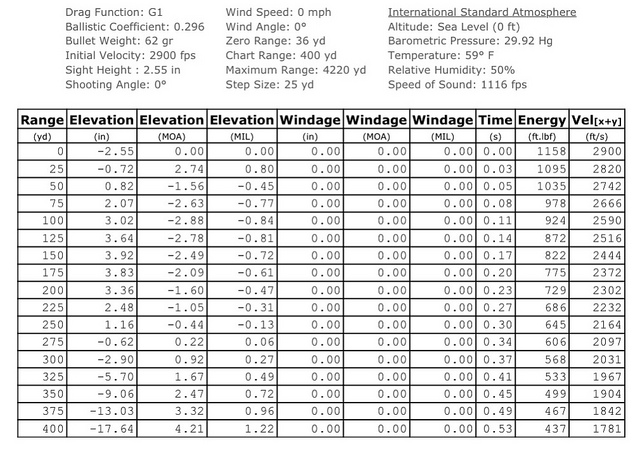
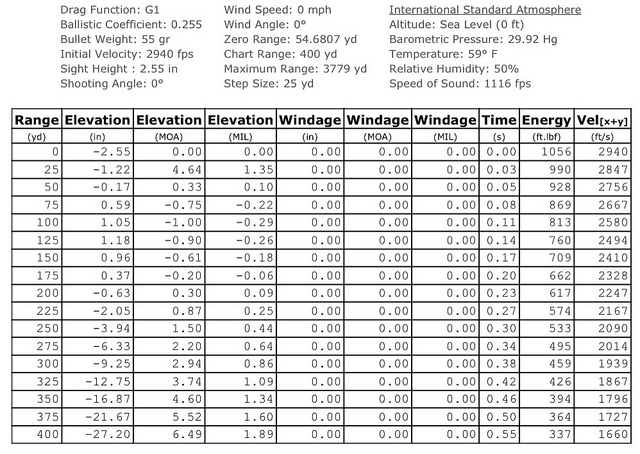
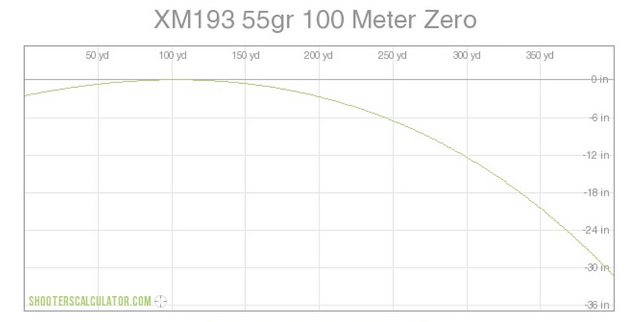
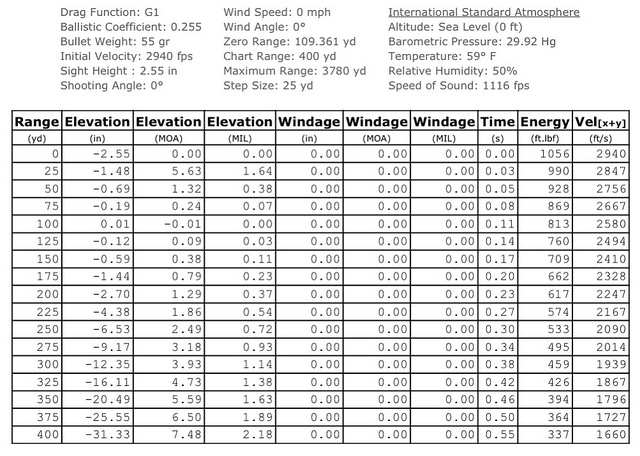
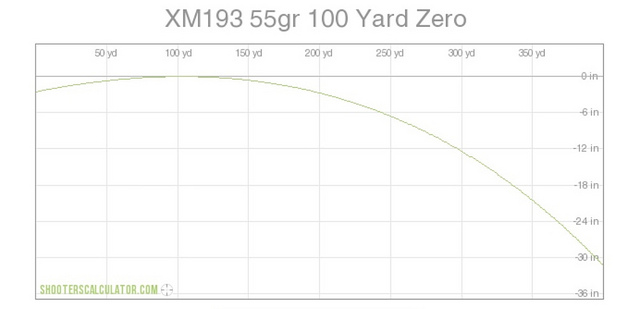
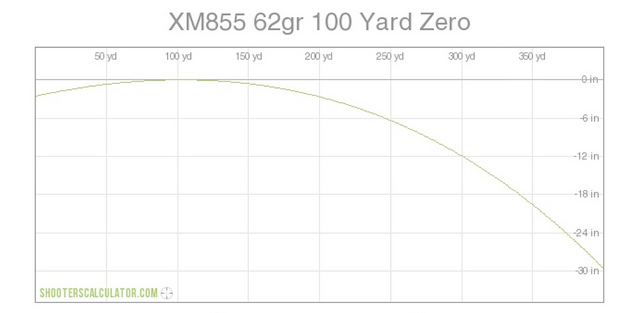
Lets also make note that in general we will be referencing the approximate trajectories of the two most common ammunition, standard XM193* 55gr and XM855* 62gr. Why do I say approximate? Because until you get out and shoot your AR15 everything is just an educated guess based off of numbers and graphs of approximates. (*You can not buy “real” M193 or M855, only civilian versions).
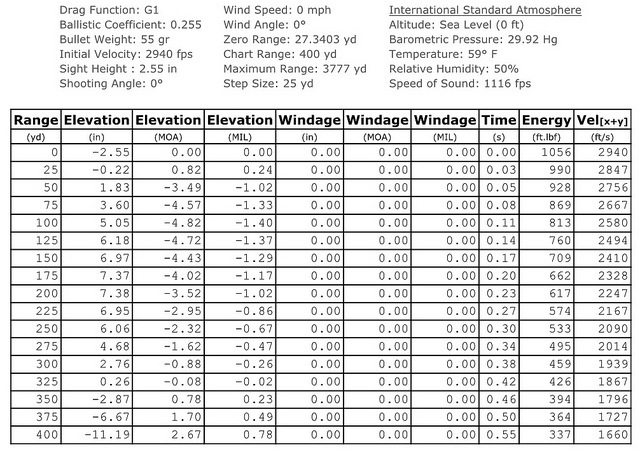
In regards to the following graphs and trajectory charts, these numbers are just basic numbers to give you an idea. These numbers depend on the bullet weight, the bullets ballistic coefficient, velocity of your given load, length of your barrel, height of your sights over the bore and even the weather. The ballistic coefficients and velocities I used were taken from Kyle Lamb’s Green Eyes & Black Rifles, the sights height was measured from my AR15 and the ballistic/trajectory calculator used is from Shooterscalculator.com.
Time to choose your zero.
The Army uses a 25/300m zero, the “m” meaning “METERS”. Yes, meters, odds are you are more familiar with yards so take that into consideration when choosing a zero. So what does a 25/300m zero mean? With this zero you will have a Near-Zero of 25 meters and a Far-Zero of 300 meters. Now we consider the trajectory and Max Ordinate (Max Arc) of our bullet. Why does this matter? Well it matters if you are shooting at a 12” plate at 100m and can’t hit your plate. Why can’t you hit your plate? You are aiming right at it!?! Because with a 25/300m zero your bullet is ~6” high at 100m and still not at its Max Ordinate (arc). At 200m your bullet will still be ~7” high as it is falling into the 300m zero. At 400 yards you are looking at a drop of 9”-11”. This is why you must know your holds for your rifle and your ammo at any given distance.


What about the Marine way, 36/300 yards zero? Here you do your initial zero at 36 yards. This is a zero used by the Marines that give them roughly 3” high at 100 yards and roughly a 4” max ordinate (max arc) between 125-175 yards. The flight of the bullet will again intersect the line of sight around 300 yards as it falls back towards the ground. At 400 yards we see a drop of about 17”-19”. Not a bad zero all things considered. Though according to our generic graph the 300 yard intersect looks more like a far zero of between 250-275 yards. Again, this highlights the need to always confirm with actual data derived from shooting at those distances.


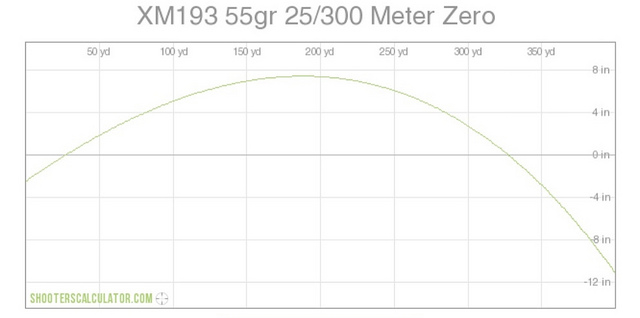
How about the 50m zero? At 100 yards your bullet will be ~1” high. Its max ordinate (arc) will be only be ~1.2” around 120 yards. By about 250 yards the bullet will only be ~4” low. By 300 yards the bullet will be ~10” low. The 50m zero is a strong contender with XM193. With XM855 we see a drop of ~3.4”-4” at 250 yards, a drop of ~9” at 300 yards and at 400 yards a drop of ~25”.


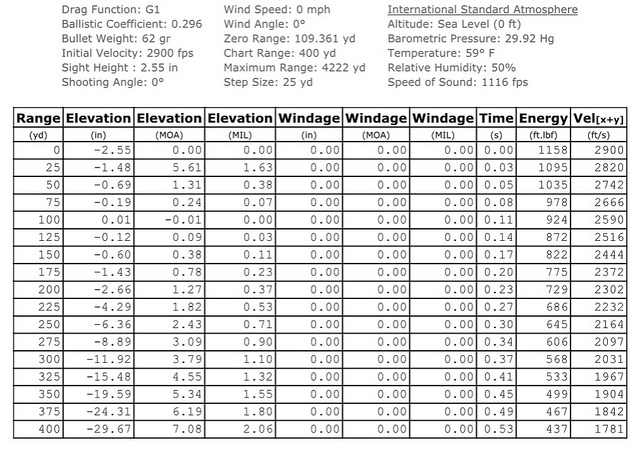
100 meter zero? With XM193 we are not seeing any major deviation until we hit 200 yards where we see a drop of ~2.7”. At 300 yards a drop of ~12” and at 400 yards ~30”. Making the 100m zero a pretty solid zero out to about 200 yards.

100 yard zero? With XM193 we are again seeing pretty good trajectory out to 200 yards where our bullet will be ~2.7” low. By 300 yards we are in the ~12” drop range and ~30” at 400 yards. Very similar to the 100m zero.

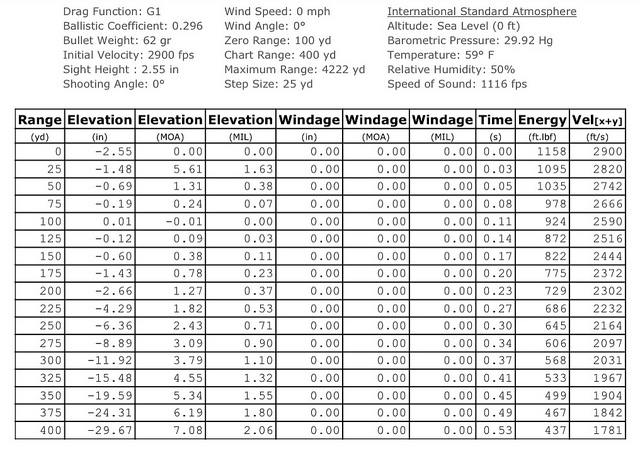
Now lets look at the 50/200 yard zero. If you recall I led into this being something of a misnomer. The 50/200 yard zero is a 50 yard zero, which will intersect the far zero again at 200 meters, or 219 yards. And yet again this is dependent on your barrel length and ammunition choice as seen by the results in the accompanying graph and trajectory chart. But for general purposes you will be close enough to make meaningful hits on your target.
During the flight of the bullet you are never more than roughly 2” above or below your POA out to roughly 250 yards where you will be about 3” low, 8” low at 300 yards and ~24” at 400 yards.

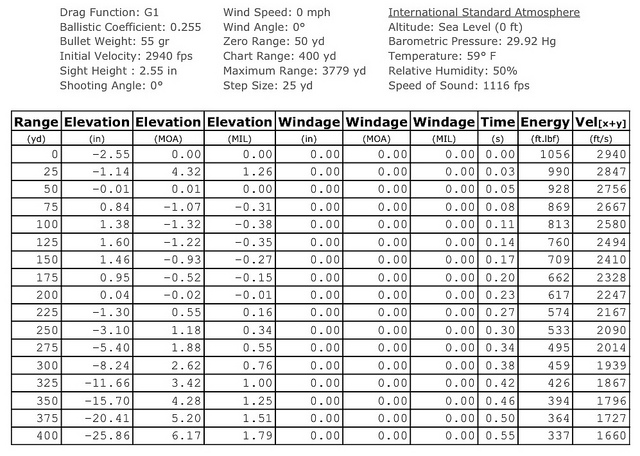
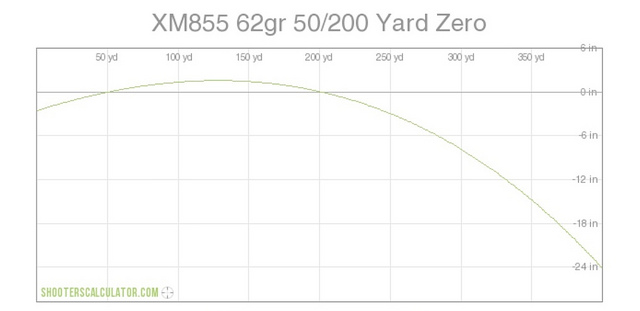
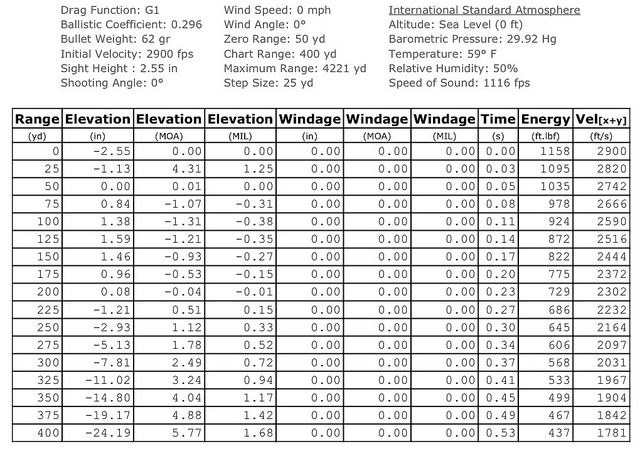
MPBR? What is the MPBR? This is the Max Point Blank Range and has been used by hunters for generations. This is a zero based on the vitals zone of the targeted game. If you are hunting an elk and the vitals zone is roughly 15”, this gives you a deviation of 7.5” up or down and you zero your rifle so the trajectory of your bullet never rises or drops more than 7.5”. The point at which the bullet falls below 7.5” is your MPBR.
If you use the “A” zone of an IPSC target being 11” and our current data with XM193 our MPBR is 342 yards with a near zero of 31 yards and a far zero of 294 yards. This will net you a Max Ordinate of ~5.61” around 170 yards. Not a bad zero but does it really offer much over the 36/100 yards Marine zero?
Lets reduce the target zone to 6”. This gives us a near zero of 40 yards and a far zero of 241 yards with a MPBR of 279 yards. Our bullets Max Ordinate will be ~3.02” around 145 yards. This gives us ~3” high or low out to 279 yards. Also not a bad zero, but what does this offer us over the 50/200 yards zero?

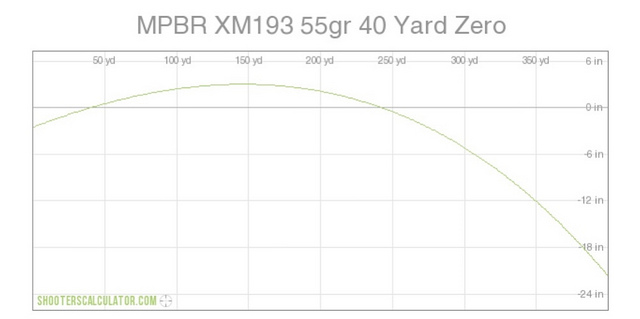
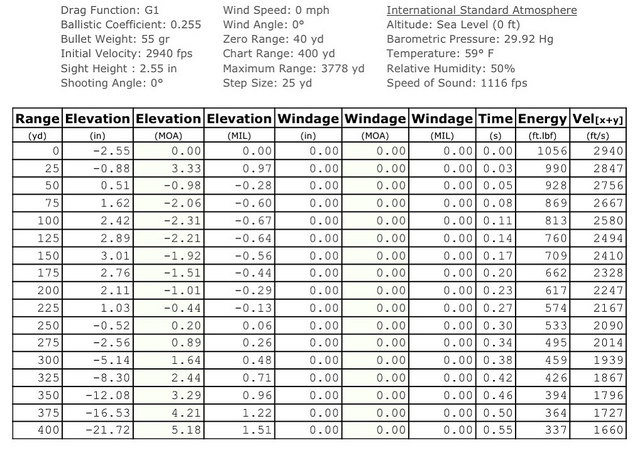
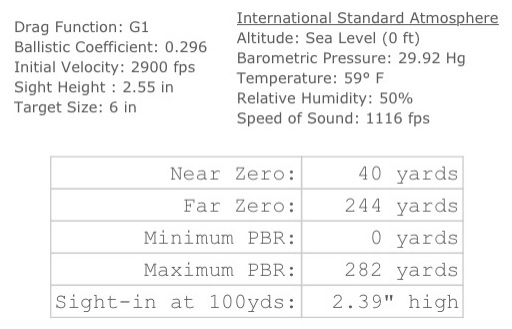
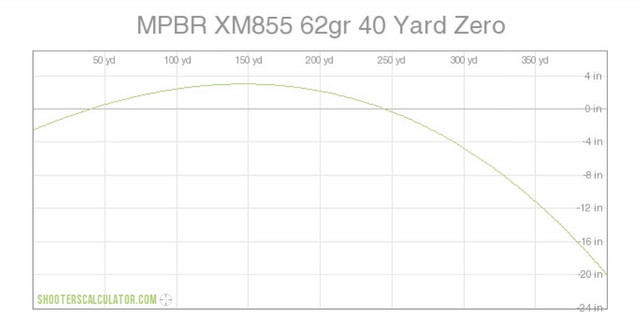
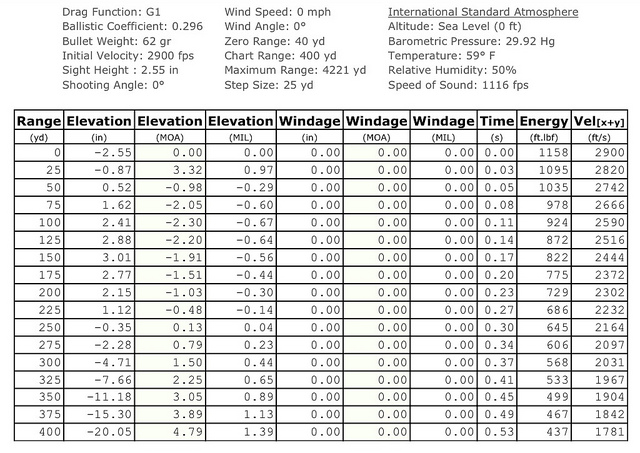
Are you thoroughly confused at this point? Still not sure which zero you should choose? I suggest you take the following into consideration:
– What twist is your barrel?
– What ammunition load do you what to shoot?
– What distance do you plan on shooting the most at?
– Do you have to shoot at a range that only allows certain distances?
– Are you shooting paper or do you plan on hunting with this AR15?
– Are you going to compete in the action shooting sports or High Power?
– What is your acceptable amount of deviation through a given distance?
With those questions answered you can pick a distance to start with. Once zeroed, it is on you, the shooter, to get out and shoot at any given distance and see what you, your AR15 and ammunition choice can do.
For the record, I personally zero all my AR15’s at 50/200 yards and mostly with 55gr Wolf. The exception being my Self Defense/Home Defense (SD/HD) AR15 and my Hunting AR15 (which is the one you see in this BRM Series). Both still zeroed at 50/200 but with different loads.
While this may seem like a lot, don’t over think it. Pick one based on the above criteria and we can get out and zero our AR15.
*This post and the information herein is for informational and educational purposes only. Use at your own risk. Always follow the 5 rules of Firearms Safety when handling any firearm.
*If you like this content and would like to support the page you can do so here.

Guns and Art
Shooting Guns and Drawing Guns
